


107
Editing
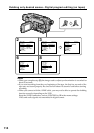
Dubbing only desired scenes – Digital program editing (on tapes)
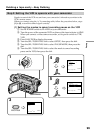
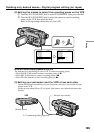
Step 1: Connecting the VCR
You can connect either an A/V connecting cable or an i.LINK cable.
When you use the A/V connecting cable, connect the devices as illustrated in page 94.
When you use the i.LINK cable, connect the devices as illustrated on page 96.
If you connect using the i.LINK cable
With a digital-to-digital connection, video and audio signals are transmitted in digital
format for high-quality editing.
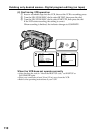
Step 2: Setting the VCR for operation with the A/V connecting
cable
To edit using the VCR, set up your camcorder to send the control signal by infrared rays
to the remote sensor on the VCR.
When you connect using the A/V connecting cable, follow the procedure below, steps
(1) to (4), to send the control signal correctly.
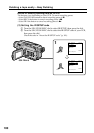
(1) Set the IR SETUP code
1 Set the POWER switch to VCR on your camcorder.
2 Turn the power of the connected VCR on, then set the input selector to
LINE.
When you connect a video camera recorder, set its power switch to VCR/
VTR.
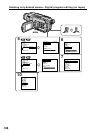
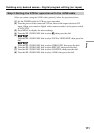
3 Press MENU to display the menu settings.
4 Turn the SEL/PUSH EXEC dial to select
, then press the dial.
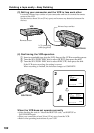
5
Turn the SEL/PUSH EXEC dial to select TAPE in VIDEO EDIT, then press
the dial.
Turn the SEL/PUSH EXEC dial to select VIDEO EDIT, then press the dial.
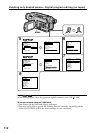
6 Turn the SEL/PUSH EXEC dial to select EDIT SET, then press the dial.
7 Turn the SEL/PUSH EXEC dial to select CONTROL, then press the dial.
8 Turn the SEL/PUSH EXEC dial to select IR, then press the dial.
9 Turn the SEL/PUSH EXEC dial to select IR SETUP, then press the dial.
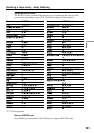
0 Turn the SEL/PUSH EXEC dial to select IR SETUP code number of your
VCR, then press the dial.
Check the code in “About the IR SETUP code” (p. 101).