


TrackSnap Manual
Model TS-DSC-S40-01
Page 4 of 12 Version
TS S40.01 This document comprises information provided by Suppliers and is
assumed to be correct.
Draft
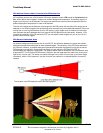
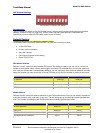
Auto Walk-Test mode on power up
When turning power on to your TrackSnap both the red and green LED will light up. They will both stay on
for 30 seconds. This time will allow the PIR circuit to warm up. After this time expires the green LED will turn
off and the red LED will blink 5 times letting you know that the board is entering a 1 minute automatic walk-
test phase. At this point you can move around the camera setup and check out the PIR area. Both the green
and red LED’s will light when motion is detected. After the 1 minute automatic walk-test phase expires the
red LED will blink 5 times letting you know the camera system will now become active.
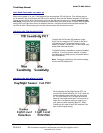
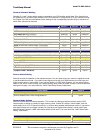
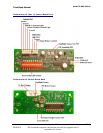
Adjusting the PIR Sensitivity POT
To adjust the PixController PIR detection range
simply turn the single turn POT shown to the left to
your desired range. The default setting is in the
middle, as shown. The two “dots” on the Philips head
screw show the actual location.
The default setting is desirable for almost all weather
conditions. In very hot summer months, or setups
over fields with no shading cover you should reduce
the PIR sensitivity.
Note: Turning the sensitivity to the minimum setting
will turn the PIR detection off.
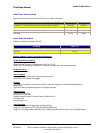
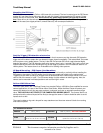
Adjusting the Day/Night Cal. POT
When adjusting the Day/Night Sensor POT you
must first set the DIP switches 3 & 4 “Up” when the
board is powered down, and then turn the board
on. The “Red Control LED” will light up when the
detection level detects darkness. You may want to
adjust this in the darkest setting you want to run
your system at when adjusting this POT. When
finished you will need to return DIP switches 3 & 4
back to their original setting.