


12
CAMERA OPERATION
Once your camera has been setup, you are ready to begin using it to
capture photos of activity in the area you choose to locate it. Just follow
these steps:
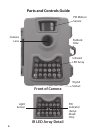
1. Mount the Camera
It is recommended that you mount the camera about 4 or 5 feet (1.2~1.5
meters) o the ground, with the camera pointed at a slight downward
angle. It’s best to avoid mounting the camera facing east or west as the
rising and setting of the sun could produce false triggers and overexposed
images. Clear branches and other debris away from the front of the
camera so as not to block the camera lens or PIR sensor.
Make sure that both door latches are securely locked in place, to ensure
proper weather resistance.
2. Power On the Camera
The camera will be in “sleep” status after it has been powered on. When
the PIR sensor is triggered, it will start to take photos immediately after
the delay time (as set) has passed.
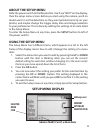
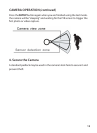
3. Test the Coverage Area
One of the 119200W Surveillance Camera’s most useful features is the
ability to test the coverage area.
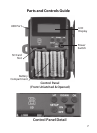
After mounting the camera, open the front housing and slide the Power
switch to the “ON” position. Press the SETUP button if necessary to enter
the Setup Menu.
The PIR indicator light below the lens will blink when you have entered
the coverage area.
Adjust the camera position as needed and repeat the test until the
desired coverage area is achieved.