


6
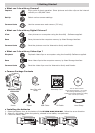
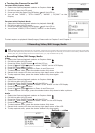
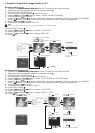
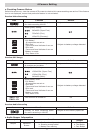
• Setting Picture/Video clip Quality
1. Select the Capture/playback selector to Capture Mode
2. Pull left to open the LCD panel
3. Press the Power On/Off button until the LCD on
4. Press UP and DOWN button to select “Video” or “Still Image” on the LCD Display
5. Press OK Button to confirm
6. Press RIGHT button
7. Press UP and DOWN button and select “Quality”
8. Press RIGHT button
9. Press UP and DOWN button to set the Quality. ie Super Fine/Fine/Economy.
10. Press OK Button to confirm Quality selected
11. Press LEFT button to resume capture mode
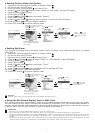
Start A
Press Shutter down fully to
record; press shutter down
fully to stop.
Press to pop out the menu.
Press to return to the
previous screen.
Default----video
Press to select
item.
MENU
OK
Main Menu
Press
OK
to
conrm the quality
and return to main
menu.
Press to select
item.
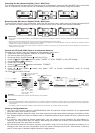
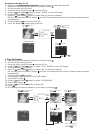
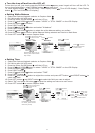
• Setting Self-timer
Your Camera is designed with a self timer function which will allow you to take pictures with a 10 second
timer built in.
1. Select the Capture/playback selector to Capture Mode
2. Pull left to open the LCD panel
3. Press the Power On/Off button until the LCD on
4. Press UP and DOWN button to select “VIDEO” or “STILL IMAGE” on the LCD Display
5. Press OK Button to confirm
6. Press RIGHT button
7. Press UP and DOWN button and select “Timer”
8. Press RIGHT button
9. Press UP and DOWN button and select “ON” to activate self timer
10. Press to confirm Self-timer activated
11. Press LEFT button to resume capture mode
Start A
Press Shutter down fully
to record; press shutter
down fully to stop.
Press to pop out the menu.
Press to return to the
previous screen.
Default----video
Press to select
item.
MENU
OK
Main Menu
Press
OK
to select
the item and return
to main menu.
Press to select
item.
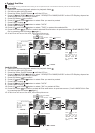
Remarks:
Press any button within the 10 second self-timer will disable the Self-timer function.
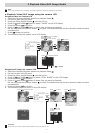
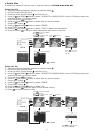
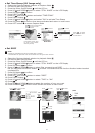
• Using the SD (Secure Digital) Card or MMC Card
Your camera comes with approximately 7MB of built-in flash memory for storing pictures/video clip/ audio.
You can expand memory using a commercially available SD Card/MMC Card. The camera senses whether a
memory card is inserted, and automatically saves pictures accordingly. Note that you can not save pictures
to built-in flash memory while a memory card is installed in the camera.
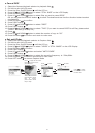
IMPORTANT!
• Make sure you turn off the camera before inserting or removing a memory card.
• Be sure to orient the card correctly when inserting it. Never try to force a memory card into the slot when you feel resistance.
• Though the camera also supports use of an MMC (MultiMediaCard) in place of an SD memory card, the data processing speed in the case of
an MMC is much slower than that for an SD memory card. Because of this , we recommend that you choose an SD memory card whenever
possible.
• SD memory cards have a write protect switch, which you can use to protect against accidental deletion of picture data. “Whenever you want
t orecord, format or delete item in the SD Card, you must disable write protection before any of above to action.”