17
En
Part names and functions
! If you accidentally cancel the hot cue callout mode, once again press
the [CALL] button.
! rekordbox can be preset so that hot cues are called out automatically
when tracks are loaded.
“ ” is displayed on the track list for tracks for which auto hot cue
loading is set.
Deleting hot cues
Press one of the [HOT CUE/4-BEAT SAMPLER (A, B, C)]
buttons while pressing the [SHIFT] button.
The hot cue stored at the corresponding button is deleted, the button
turns off, and a new hot cue can now be stored at that button.
Using the sampler function
Four beats of sound can be sampled. Samples that have been stored can
be called out and played later.
! Up to three samples can be stored per deck.
! After editing (recording or deleting) a sampled sound source, be sure
to press the [STANDBY/ON] button to turn the power off.
If the power is turned off without pressing the [STANDBY/ON] but-
ton, the edited results are not retained in the memory.
Storing samples
1 Press the [MODE (HOT CUE/4-BEAT SAMPLER)] button
to switch to the sampler mode.
The [4-BEAT SAMPLER] indicator lights.
2 Press one of the [HOT CUE/4-BEAT SAMPLER (A, B, C)]
buttons.
The point at which the button is pressed is set as the recording start
point, four beats worth of sound or the first 5 seconds of the sound is
sampled, and the button lights blue.
! If a sample is already stored at a
[HOT CUE/4-BEAT SAMPLER (A, B, C)] button, it is not possible
to store a new sample there. To store a new sample, first delete the
stored sample.
Playing samples
Press and hold a [HOT CUE/4-BEAT SAMPLER (A, B, C)]
button.
The sample is played while the button is pressed.
! The volume of the sample can be adjusted at [SAMPLE LEVEL] on
the [UTILITY] menu.
Deleting samples
Press one of the [HOT CUE/4-BEAT SAMPLER (A, B, C)]
buttons while pressing the [SHIFT] button.
The sampled sound stored at the corresponding button is deleted, the
button turns off, and a new sample can now be stored at that button.
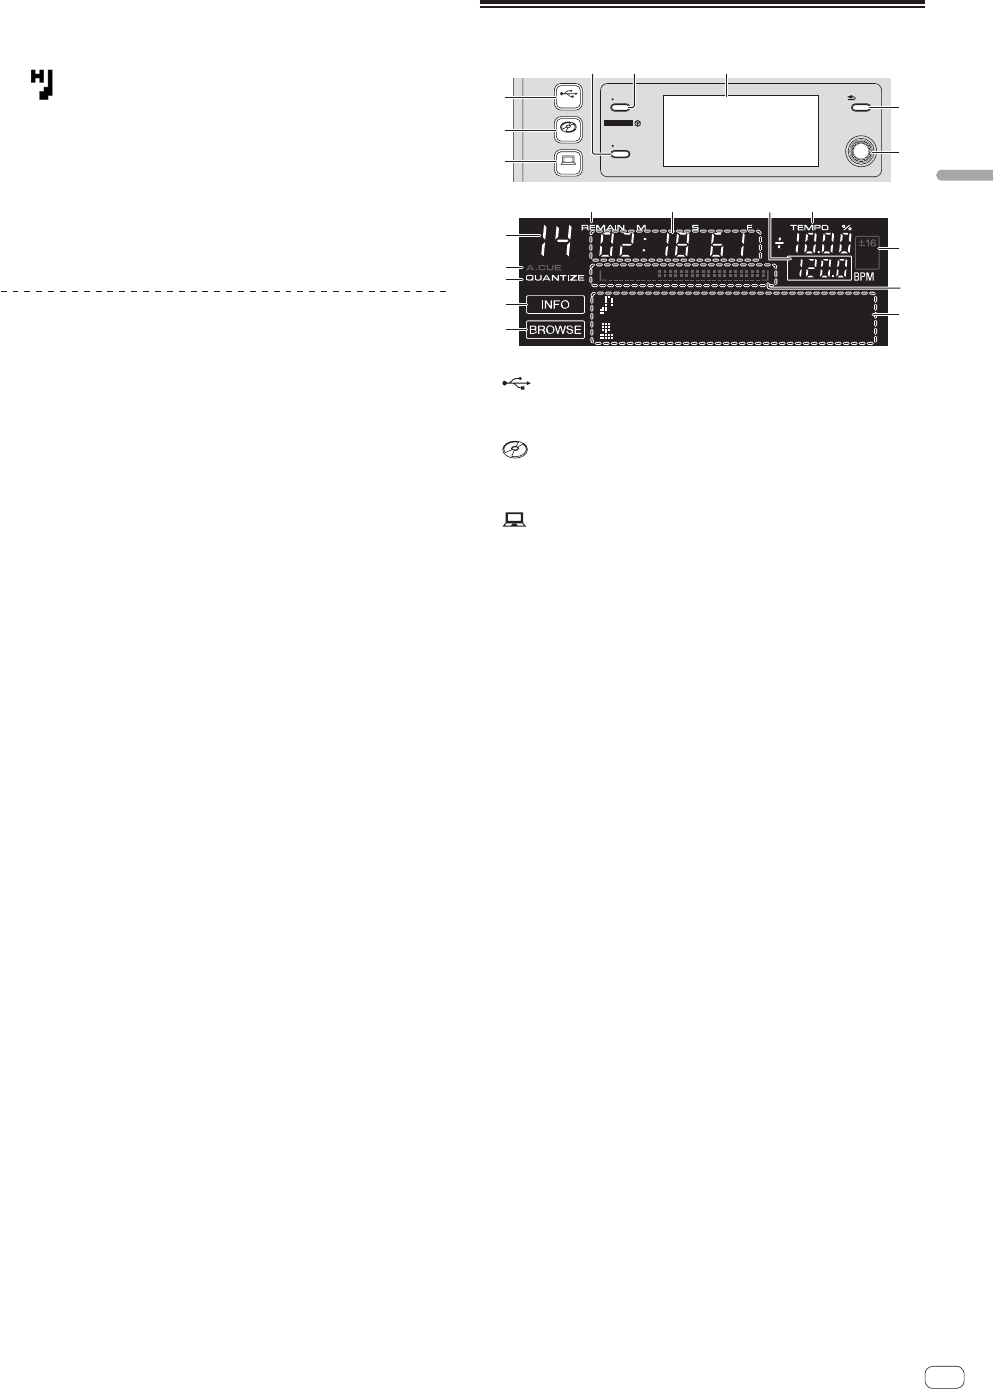
Browse section
USB
CD
MIDI
SELECT PUSH
TIME
−
AUTO CUE
−
UTILITY
INFO
QUANTIZE
BACK
−
TOP
4 5 6
ab c d
9
f
h
g
3
2
1
7
8
e
j
k
i
1 USB button
Press this to play the music files on a USB device.
= Playing media connected to or inserted in this unit (p.22)
2 CD button
Press this to play the music files on a CD or CD-ROM.
= Playing media connected to or inserted in this unit (p.22)
3 MIDI button
Press this to use DJ software.
= Using the DJ software (p.27)
4 INFO(UTILITY) button
! Press:
The main unit display switches to the information display mode.
When in the information display mode, the information display
section switches between the track name display, beat display or
auto loop/effect display each time the button is pressed.
! Press for over 1 second:
The [UTILITY] screen is displayed.
= Changing the settings (p.24)
5 TIME (AUTO CUE,QUANTIZE) button
! Press:
The main unit display’s time display mode switches to the
elapsed time or remaining time display.
! Press for over 1 second:
When pressed for over 1 second, auto cue turns on and off.
! [SHIFT] + press:
This turns the QUANTIZE function on and off.
= Using the QUANTIZE function (p.23)
6 Main unit display
7 BACK(TOP) button
! Press:
The screen moves back to the layer above.
! Press for over 1 second:
Press for over 1 second to move to the top layer.
8 Rotary selector (SELECT PUSH)
9 This displays the track number.
a REMAIN
This is displayed when the time display is set to the remaining time.
b Time display (minutes, seconds and frames)
c BPM
Displays BPM (Beats Per Minute) of the track currently being played.
The value changes according to the position of the [TEMPO] slider.
d TEMPO %
This indicates the percentage by which the playing speed is
changed.
