© Titan Tool Inc. All rights reserved. 5
Operation
Read and understand the warnings at the front of
this manual before operating this equipment.
Setup
Perform the following procedure before plugging in the power
cord of the sprayer.
1. Attach the uid hose to the uid outlet tting on the
sprayer.
a. For the PowrTex 300DD, thread the 3/4” female NPT
tting onto the male uid outlet tting on the sprayer.
3/4” Female
NPT Fitting
300
DD Fluid Hose
Male Quick
Disconnect Fitting
Air Hose
Spray
Gun
Sprayer
b. For the PowrTex 600DD, couple the 1” female quick
disconnect tting to the male uid outlet tting on the
sprayer.
1” Female Quick
Disconnect Fitting
600
DD Fluid Hose
Male Quick
Disconnect Fitting
Air Hose
Spray
Gun
Sprayer
NOTE: The uid hose and air hose included with the
sprayer are bonded together for ease of use.
PowrTex 300DD PowrTex 600DD
Fluid Outlet Fitting
Air Outlet Coupling
Fluid Outlet Fitting
Air Outlet Coupling
2. Attach the other end of the uid hose to the uid tting on
the PowrTex spray gun. Tighten securely.
3. Attach the male quick disconnect tting on the air hose to
the air outlet coupling on the sprayer.
4. Attach the female quick disconnect tting on the air hose
to the air inlet coupling on the PowrTex spray gun.
5. Install the appropriate texture nozzle for the material
being sprayed (refer to the”Installing a Texture Nozzle”
procedure in the Spray Gun Operation section as well as
the “Texture Nozzle Chart” in the Parts List section of this
manual). While triggering the gun, tighten the nozzle nut
securely.
IMPORTANT: Always pull the spray gun trigger when
tightening the nozzle nut. Failure to pull the trigger can
result in damage to the texture nozzle and gun needle
assembly.
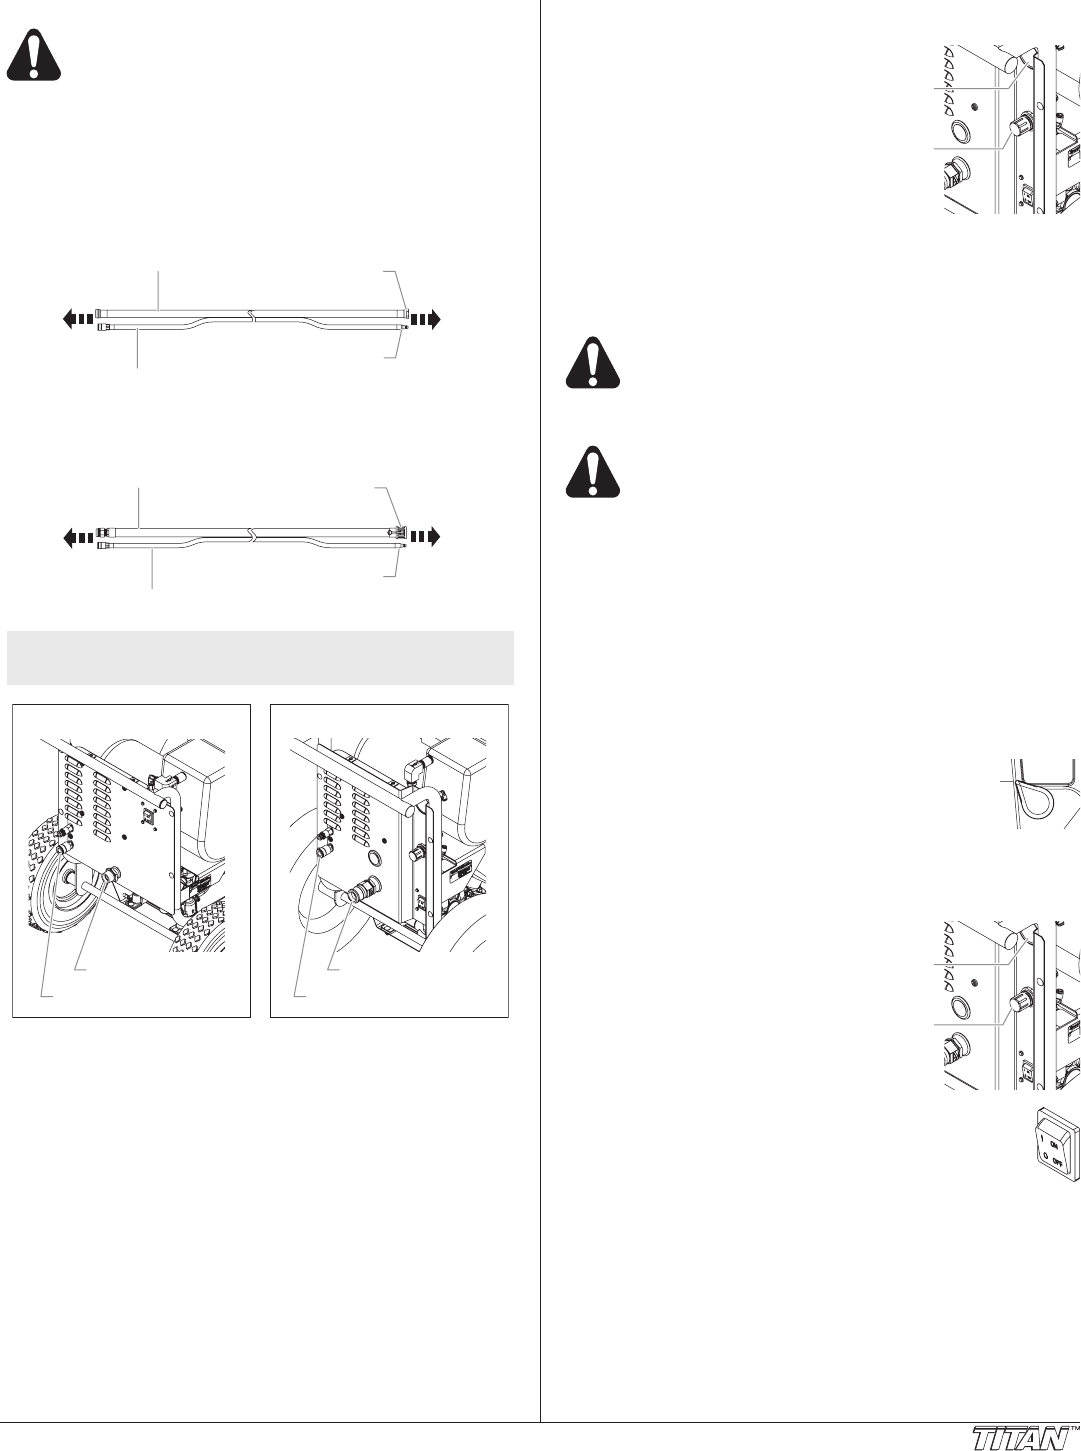
PowrTex 600DD
Pressure
Gauge
Fluid
Pressure
Regulator
6. For the PowrTex 600DD
only, make sure the uid
pressure regulator is turned
fully counterclockwise to its
minimum pressure position.
7. Make sure the air lter on
the compressor is clean and
installed.
8. Make sure the electrical
service is 120V, 15 amp
minimum.
9. Plug the power cord into a properly grounded outlet.
IMPORTANT: Always use a minimum 12 gauge, three-wire
extension cord with a grounded plug. Never remove the
third prong or use an adapter.
Be sure to follow the Pressure Relief Procedure
when shutting the sprayer down for any purpose,
including servicing or adjusting any part of the
spray system, changing or cleaning spray nozzles,
or preparing for cleanup.
The air compressor motor is protected from
thermal overload by a thermal protector switch. If
the motor overheats, the thermal protector switch
will shut off the motor automatically. Make sure all
guards and shrouds are in place on the
compressor before pressing the reset switch after
a thermal overload. If this occurs, allow the motor
to cool for 10–15 minutes. Then, press the reset
switch located on the motor housing to restart the
motor.
Preparing to Spray
Use the following procedure to ush the sprayer with water
before spraying begins. This will remove any sediment that may
be in the system.
1. Fill the hopper 1/4 full with water.
2. Move the air adjustment valve on the spray gun
to the half-open (45º) position.
3. For the PowrTex 600DD only, turn the uid pressure
regulator fully counterclockwise to its minimum pressure
position.
PowrTex 600DD
Pressure
Gauge
Fluid
Pressure
Regulator
4. Turn on the sprayer by
moving the ON/OFF switch to
the ON position.
5. For the PowrTex 600DD
only, turn the uid pressure
regulator clockwise until the
pressure gauge reads 30 PSI.
6. Trigger the spray gun into a
waste container. Continue
holding the trigger open until
the water has emptied from
the hopper.
7. Turn off the sprayer by moving the ON/OFF
switch to the OFF position.


