


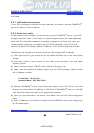


Network Video Server User’s Manual
Seyeon Tech Co., Ltd
27
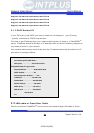
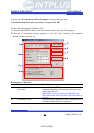
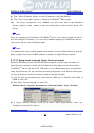
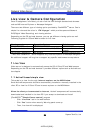
IP Address Input an IP address to be assigned to
FlexWATCH
TM
server
Note that the IP must be directly connectable
with user’s PC. The above IP ’10.10.225.100’ is
only an example.
C IP, Subnet, Gateway Whether to change IP, Subnet and Gate or IP and
Subnet mask only.
D
‘Set IP Address’ Button To activate a new IP assignment, click this
button.
E ‘Save IP Address’ Button To save IP-Address in the Flash Memory.
F ‘Go to Home Page’ Button To launch FlexWATCH Web browser and start
other configuration through Administration page.
G ‘Telnet to System’ Button To guide you Telnet mode for Advanced
Configuration.
H Result window Show the result of IP assignment. If failed, try
again from the start or use other configuration
method
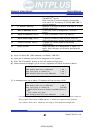
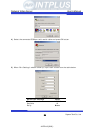
3) Input the Serial No. (MAC address) and Select “LAN Port”.
4) Input the IP address, which will be assigned to the system.
5) Click “Set IP Address” button to save the above configuration.
6) Check whether message type is correctly appeared on Result window as below.
------------ Set Server IP Address ------------
ARP: Adding static entry to ARP table [ OK ]
Ping: Trying ping 10.10.225.100 [ OK ]
ARP: Deleting static entry from ARP table [ OK ]
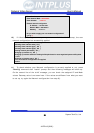
7) If message come up as below, IP address setting has been failed.
------------ Set Server IP Address ------------
ARP: Adding static entry to ARP table [ OK ]
Ping: Trying ping 10.10.225.100 [FAILED]
Please check whether IP address and MAC address is
valid.
Then, please retry again.
ARP: Deleting static entry from ARP table [ OK ]
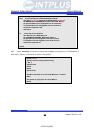
- If IP address setting is failed, please check whether correct IP/MAC address is entered.
And try again with correct IP/MAC address, or please use HyperTerminal method.
- If the above result is O.K., follow the next step to finish Network Configuration.
- INTPLUS [2005] -