


Pelco Manual C2914M-F (08/05) [ 17 ]
Camera Synchronization
When using more than one camera power supply, a brief vertical roll may occur on the monitor when a camera
view is switched. To eliminate this vertical roll, it is necessary for the cameras to be synchronized. If the cameras
are connected to certain Pelco matrix products, the cameras will automatically lock to the pulse signal that is
transmitted up-the-coax. If not, it will be necessary to synchronize manually.
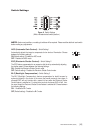
Cameras can be line locked or synchronized internally. Select the preferred method using the INT/LL DIP
switch on the rear of the camera (refer to the Switch Settings section).
If a camera is connected to a DC power supply, the camera will switch to Internal (INT) mode, regardless of the
DIP switch setting.
Internal (INT) mode should be selected when a noisy AC power supply is being used.
It may be necessary to have two people in communication when line locking cameras: one person at the
camera and another person at the monitor to observe the vertical roll and the effect of any adjustments made at
the camera.
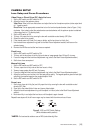
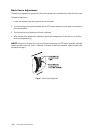
To line lock the cameras, do the following:
1. Set the INT/LL DIP switch to LL.
2. Choose a reference camera to which all other cameras will be phased.
3. Select a camera and synchronize it to the reference camera, using the advance and retard buttons on the
rear of the camera (refer to Figure 1) to adjust the point on the AC cycle at which the cameras trigger.
4. Each time an adjustment is made, switch back and forth between the camera you are adjusting and the
reference camera. Repeat this process as many times as necessary until the roll between the cameras is
no longer noticeable.
5. Adjust the phase of all other cameras by repeating steps 3 and 4. Always adjust to the reference camera
selected in step 2.
NOTE: The preferred method for camera phase adjustment is to use a dual trace oscilloscope to align the
vertical sync pulses of the reference camera to the selected camera or cameras.