


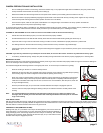

CAMERA PREPARATION AND INSTALLATION
1. Prior to installing the camera in the housing, remove the camera strap, or any object that might obstruct installation, third party camera strap
hookup should be removed from the camera prior to setting up.
2. Remove the saddle from the housing lift the rear LCD panel of the camera up and carefully place the camera on the tray.
3. Ensure the camera is properly installed by aligning the tripod socket of the camera with the tray mounting screw. Tighten the tray mounting
screw securely while ensuring that the camera position and the LCD is not altered,
4. Once secured in place, lower the LCD panel, it will fall back to a 15 degree angle. Lift the ash in the full up position and slide the
quick release tray back into place as per drawing at right.
An optional internal moisture alarm is available for your AQUATICA Digital housing (Product # 20023). This moisture alarm is powered by an easily re-
placed CR 2032 battery. Please read the instruction sheet provided for your moisture alarm prior to installing the battery.
CLOSING OF THE HOUSING: Once the camera is secure on the saddle inside the front half of the housing:
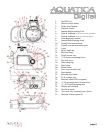
A. activate the on/off lever switch (key # 01) to conrm the camera is properly installed.
B. Activate the ash lever to see that the ash actually shuts down and that the ash blocking mask goes all the way up
C. Inspect the main O-ring on the rear half of the housing to conrm it is clean, lubricated and properly seated for a positive seal.
D. The sealing surface on the front half of the housing is clean and free from any scratches or physical damage.
E. Close the door gently and secure the latch, verify that the locking tab is engaged. To open reverse the process, push on the locking tab and
lift the latch.
CAUTION: if you feel any resistance as you attempt to close the latch, do not force the closure. Check for any obstructions and try again.
F. To avoid any accidental opening. Always verify that the safety locking mechanisms of the latch is properly engaged prior to entering water.
MOUNTING THE PORT
Before mounting the Port on the Housing always ensure that the port O-ring is clean, lubricated and properly seated in its groove and that he sealing sur-
face on the Housing is clean and free of physical damage.
The AQUATICA Digital AN-5 Housing features a locking bayonet mount. To mount the port or extension ring simply:
1. Place the housing on its back on a soft and steady surface.
2. Rotate the port lock lever (Key #17) clockwise until it stops. Place the port or extension ring inside the port opening
of the housing. Align one of the four alignment notches with the opening of the housing.
3. Place your hands on opposite sides of the port or extension ring and push the port or extension ring in with even
force on both sides until you feel it snap into place. Make sure the bayonet is completely inside the housing and
rotate the Port clockwise until it stops. Do not force it, if there is too much resistance, take the port off, check the
O-ring for damage and retry
4. Push the port lock lever (key # 17) in and rotate it counterclockwise until it stops to engage the port lock
5. Check to ensure for the proper seating and sealing of the port or extension and that it is safely locked on the
housing.
Note: It is recommended that you familiarize yourself with this mount by trying it without a camera in the
housings, this will allows you to see the inside view of the bayonet mount and of the ports or extension
rings in the housing.
LENS INSTALLATION
With the camera inside the housing, install the lens prepared with its gears (if needed) through the port opening in the front of the housing. When using a
gear always conrm that it is properly installed and aligned on the lens. Rotate the focus / zoom control knob to ensure that the gears are properly meshed,
that their rotation is smooth and that it does not do not grind or bind.
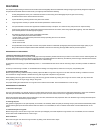
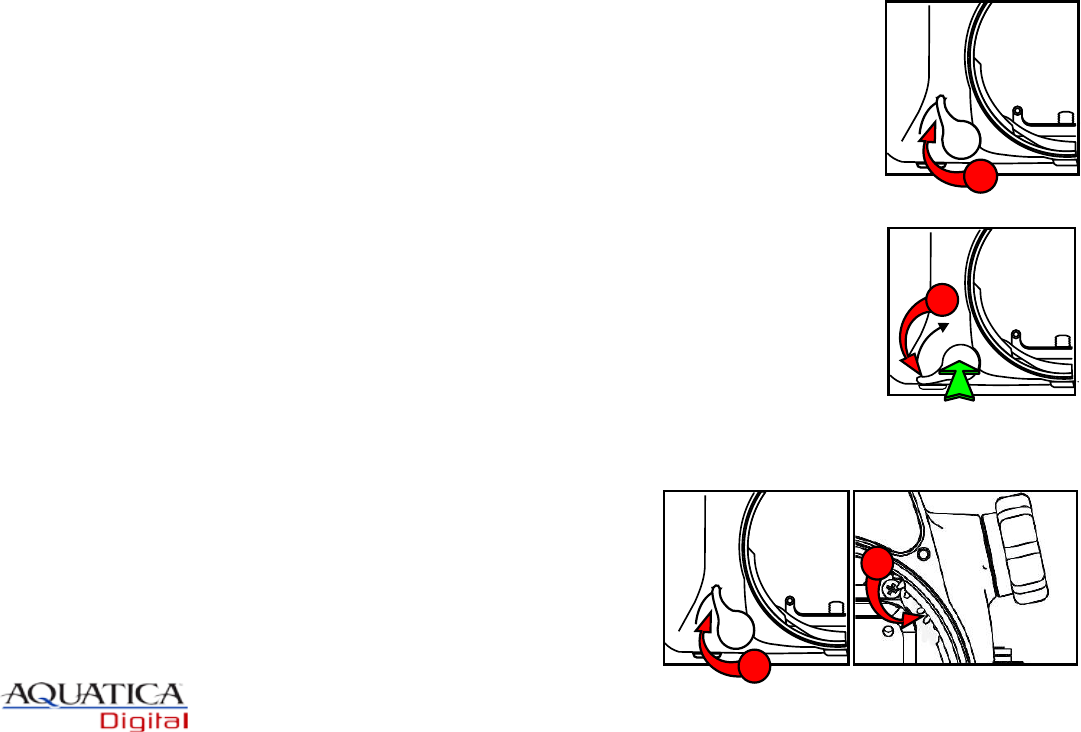
CHANGING A LENS (REMOVING A LENS)
Rotating lever (Key # 17) clockwise until it stops will disengage the port lock and move the
pinion gear (# Key 11) out of the way so you can remove the camera with the lens attached or
simply exchange port on the housing. Replace lens and and port if necessary, then reinstall
by reversing this procedure, nally push the port lock lever (key # 17) in and rotate it counter
clockwise until it stops to engage the port lock
UNLOCK
17
page 5
UNLOCK
PUSH
17
UNLOCK
11
17