


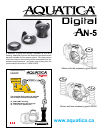
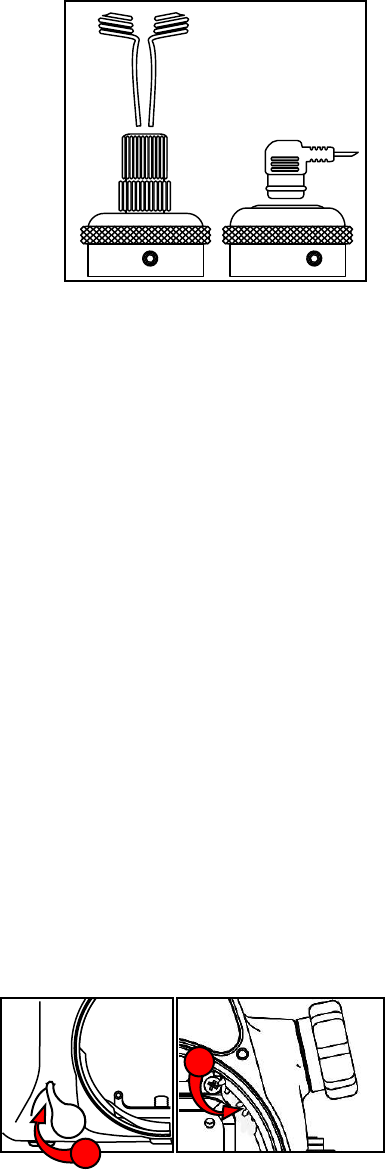
OPTICAL CONNECTORS
The Aquatica AN-5 housing is equipped with two optical port connectors, as well the housing is supplied
with adapter for typical straight cord used by INON and various strobe manufacturers with adapters for
angled Sea & Sea type cords, select the desired adapter and install it on the optical port base, tighten the
set screw into place with the supplied hexagonal wrench.
In order to use Optical triggering, the built-in ash of the camera need to be in the up position, this can be
done at time of installation or later by using the lever (key # 5).
Select the proper sync mode you wish to
use in the camera ash menu (rear, slow, etc.).
Note: it is advisable to turn the camera and external strobe off when travelling to your dive site in order to
avoid useless drain of the camera and strobes the batteries. Also eld testing as shown that mixing brand
of strobes give unreliable result and should be avoided if possible.
TAKING A PICTURE
Following are some basic techniques used in underwater photography. For more information and advanced photography please study the Sony
AN-5 instruction manual.
1. Rotate the control wheel to select the desired exposure mode; the chosen exposure mode will appears on the rear LCD window. Exposure Mode
options in sequence are: Programmed Auto (P), Shutter Priority Auto (S), Aperture Priority, Auto (A) or Manual Exposure (M). Scene mode and
Intelligent Auto are not recommended for use underwater, typically the manual (M) and Aperture priority (A) are the most adapted for underwater
photography
2. Control of Auto Exposure compensation is accessed via the control wheel (key # 21), by pushing the lower part of the wheel in (same as would
be done on the camera itself) this control is vital for video shooting, rotate the control wheel to select the proper exposure parameter and press the
enter button (key # 22) to accept.
Note: When shooting with strobes it is recommended that the camera be used only in Single Frame Motor Drive or there is the possibility
that the camera will re before the ash can fully recycle.
USING THE HOUSING
Whenever changing ports or O-rings, it is highly advisable to perform a simple seal test without the camera inside. Strapping a weight to the housing and
lowering it to a depth of 30 to 50 feet of water for at least 10 minutes will assure you that the seating of the new port or o-ring is proper. This test, though
time consuming and often considered unnecessary, may save your camera equipment from irreparable water damage. Once this test is performed the
housing is now ready for the dive.
CAUTION: Never jump into the water with the housing. It is best to have the system handed to you after you have made your entry, or have it lowered gently
to you on a line. Make certain that lanyards of other equipment stay clear of the system when rinsing.
When photographing, be sure to respect the environment. Avoid damaging marine life or manipulating sea creatures to obtain a pleasing photo. The housing
is slightly negatively buoyant so that you can lay it down on the bottom, but avoid laying it on live coral or other delicate marine life.
Changing the memory card and battery
Always take care to thoroughly dry the housing before opening it to replace a memory card or
battery. Wipe the housing off with a dry towel. If possible it is suggested that the housing be blown
dried by directing an air nozzle around the main o-ring before opening.
Lift the port release lever up (key #17), to disengage internal pinion gear, then rest the housing on
its front with the lens facing down, be careful to protect the port surface, release the latch, open the
rear door and pull out the quick release tray with the camera and lens, be careful of any residual
water falling into the housing and on to the camera when the housing is opened. before reclosing
the housing, inspect the O-ring thoroughly to conrm it is clean.
TRANSPORTING THE AQUATICA DIGITAL HOUSING
Store the AQUATICA Digital housing in a sturdy, shock proof container. When travelling by air, remove or loosen the port. This allows for equalization of
the air pressure inside the housing to the external air pressure. Failure to do so may cause serious damage to the acrylic ports. Avoid travelling with the
camera mounted in the housing.
page 6
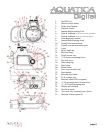
Sea & Sea Type angle
INON Type Straight cord
UNLOCK
11
17