


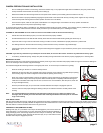


CARE AND MAINTENANCE
Of the housing:
After each and every salt water dive, your housing system should be soaked or rinsed in fresh water for at least 30 minutes. During this soaking period
reach into the water and operate all the controls several times, on the return of a dive trip, given your housing a prolonged soaking in fresh water will
prevent left over salt from settling in. Be sure to inspect the housing’s main o-ring and clean it after every use. Refer to Maintenance: Of the O-rings.
To ensure that the accessory hand grips won’t fuse on to the housing due to the exposure to salt water, it is also a good practice to occasionally remove
them. Clean and lubricate the bolts with a small amount of WD-40 or add a touch of grease.
WARNING: Use WD-40 carefully, sparingly and only on metal to metal surfaces. WD-40 can damage the acrylic on the ports, the optical sur-
faces on lens as well as the O-rings.
Of the Ports:
Care should be taken with the Dome Port and Macro Port to avoid scratches on the lens surface. The acrylic port is softer than glass so minor exterior
scratches are often unavoidable. However, since the indices of refraction for acrylic and water are almost equal to each other, the scratches, if they are
minors, are unlikely to show up and will not seriously impair image quality. Internal scratches (air side) on the other hand must absolutely be avoided as
they do not ll in with water and will affect the quality of the image.
Clean the Acrylic dome using only products recommended for cleaning acrylic and a soft lint free cloth and glass dome with approved lens cleaning
products. Dust on the interior surfaces of the port can be removed with a soft camel hair brush or a blower brush. Caution must be taken when using
aerosol devices as not to spray the lens material with the liquid propellant as this may seriously affect the optical properties of the port. Use of pressurize
air directly from a dive tank is not recommended, the high pressure force of the air stream may easily dislodge the port lens or its O-ring, It is advisable
that ports should be removed, inspected and serviced after every dive.
Of the Latch:
The latch on the AQUATICA an-5 housing is equipped with secondary safety lock to prevent accidental opening. Always ensure that this locking
mechanism is secure. Watch for the build-up of corrosion or salt residue around the latch. This will appear as a white material. Lubricate the latch oc-
casionally with a small amount of WD-40 to remove the corrosion or salt residue build-up.
Of the O-Rings:
The O-rings that need to be maintained on a regular basis are the main housing O-ring and the O-ring on the lens port The main O-ring should be
cleaned and inspected on a regular basis and the port O-ring should be cleaned every time a port or extension is changed or removed.
Of the sacricial anodes:
The anode attached to the bottom parts of the housing is there to prevent corrosion due to electrolysis, as time goes, it will deteriorates and need re-
placement, contact your dealer for a replacement set (parts # 19220).
TO SERVICE O-RINGS ON THE HOUSING MAIN O-RING, PORTS AND EXTENSION RINGS
1. Removing the O-ring. It is important never to use a sharp instrument when removing an O-ring as this may damage the O-ring groove
or the O-ring itself. A dull pointed object or the edge of a credit card usually works well.
NOTE: the main O-ring is inserted in an inverted V groove to prevent it from popping out, to remove, use a dull pointed object and insert in
the side of the small circular opening provided on the lower side of the rear part of the housing. Do not use sharp objects or excessive force
as this could result in damage to the sealing surface.
2. Once the O-ring is removed, it should be examined for damage. Check that it is free of nicks and cuts and that it retains its original round prole.
O-rings that appear to be damaged should be discarded immediately and replaced with new ones. Rinse the O-ring with fresh water and dry it
with a clean lint free cloth.
3. Clean the O-ring groove (where the O-ring sits) with a cotton swab. Be sure to remove any lint the cotton swab may leave behind. Inspect the
groove for any signs of damage. Wipe the sealing surface part of the housing that the O-ring seals against with a clean lint-free cloth.
4. Re-grease the O-ring with a thin layer of Aquatica O-ring lubricant until it appears to be smooth and shiny. Do not over grease it. Use just
enough grease so the O-ring will pull smoothly through your ngers. Excessive amounts of grease will only serve to attract dirt to the o-ring.
Make sure that the O-ring is properly and evenly seated in the O-ring groove.
5. To reinstall the clean and lubricated main O-ring, place the entire O-ring over the groove and start by pushing the O-ring in at each corners
then, push the O-ring at each side and nally, work in the rest of the O-ring. Never start at one end and work your way around the O-ring.
This places uneven tension on the O-ring which may cause the O-ring to stretch resulting in excess O-ring, which will have no place to go.
WARNING: Use only petroleum free O-ring lubricant such as our # 19213 Aquatica O-ring Lubricant. Petroleum based lubricant used by some
other manufacturer for their Silicone based O-rings can and will swell the material of our O-rings, this will make the O-ring more difcult to
install and can result in the O-ring being damaged or pinched resulting in dire consequences.
Internal O-rings on the housing controls are not user accessible, while these O-rings are not as susceptible to damage as they are not exposed, rinsing
properly with fresh water to ush out salt crystals and sand residues will be the proper way to assure trouble free operation, it is recommended by the
manufacturer to have the housing in for yearly maintenance. Aquatica has authorized service center in both the continental USA and Europe, prior to
sending the housing check for the closest service center to you on our website www.aquatica.ca.
page 7