


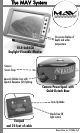
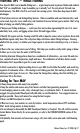

Installing your MAV
Before starting the mounting process (drilling holes, etc.), map out the precise location of each compo-
nent, as well as how cables will be run from plug to plug. Set up each component (Monitor, PowerSpool,
Footpad) temporarily in its prospective location to assure that it will be fully functional and accessible,
without interfering with adjacent items such as trolling motors, sonar, rod holders, etc. Once you’ve
determined that each component will be fully functional and easily accessible in its prospective location,
install can begin.
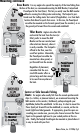
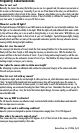
(1) Mount MAV PowerSpool: MAV PowerSpool includes
Nature Vision’s exclusive quick-detach
base, which allows for fast, easy
removal from the boat (e.g.: slide-
removal of MAV PowerSpool via quick-
detach base allows boat cover to easily
slide over boat). Begin by placing PowerSpool assembly on boat
gunnel in appropriate location. Make sure that end of spool unit
and camera housing clear the boat gunwale by at least 3 to 5-
inches, which allows camera to drop into water without obstruction.
Once PowerSpool placement has been determined, separate spool unit from quick-detach base by pulling
out quick-detach pin (sliding base from PowerSpool unit). Place mounting base on boat gunnel in exact
mounting location; trace location of four screw holes through base plate. Remove base plate. Drill four
1/4-inch pilot holes all the way through top of gunnel. Place quick-detach base plate back on gunnel,
lining it up with 4 holes. (Make sure the rounded edge of plate is facing into the boat.) Insert 4 mount-
ing screws through base plate and pilot holes. Attach washers and nuts to screws under gunnel and snug
tightly. Slide PowerSpool assembly into place and lock.
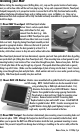
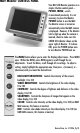
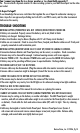
(2) Mount MAV LCD Monitor: Monitor comes assembled with a gimbal bracket for easy installation
and tilt-viewing. NOTE: Gimbal bracket can also be mounted to boat
using a Johnny Ray or RAM-style electronics bracket. First,
determine the location of your MAV LCD Monitor. Remove
Monitor from gimbal bracket using opposing thumb dials.
Place bracket on boat and trace 2 holes for mounting screw
locations. Remove bracket and drill 2 mounting holes.
Replace bracket in place and install 2 screws. Attach MAV LCD
Monitor to gimbal bracket. NOTE: Consider removing and stor-
ing MAV Monitor during high-speed highway transport, or in
rough water, especially when mounted in the bow.
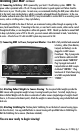
(3) Mount MAV Footpad: Once location is determined, place mounting screws in mounting holes and
screw into place. NOTE: Although the Footpad can be left loose (not mounted) inside the boat, which
allows you to operate the MAV from different locations inside the boat, permanent mounting is recom-
mend. This prevents Footpad from damage due to kicking or stumbling on the unit or cable, within the
boat.
Nature Vision, Inc. © 2006, Pg 6