


Installing your MAV continued
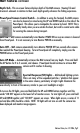
(4) Connecting to Battery: MAV is powered by your boat’s 12-volt battery system. NOTE: The
power cable is protected with a 12-volt 15-amp circuit breaker to guard against unit failure should a
short occur in your 12-volt system. In most cases, we recommend attaching the MAV power cable direct-
ly to the boat’s main starting battery, which is constantly recharged through the alternator. In the case
of smaller outboard motors (less than 50 HP), it may be advisable to connect MAV to a secondary power
source, such as a trolling motor / deep cycle battery.
If mounting the MAV in the bow of the boat, we recommend routing cables through an opening in the
nose, back toward battery. If mounting in the stern, or near boat’s center console, cables can be routed
through dash hollow, or run alongside or within side gunnels. NOTE: Should you decide to connect MAV
to deep cycle battery series of 24 to 36-volts, you must connect cable terminals to lead / main battery
in series. A feed of over 12-volts into MAV system may cause unit to fail.
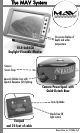
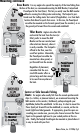
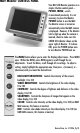
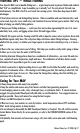
(5) Connecting MAV to Power, Footpad and Monitor: Once MAV is fully installed and connected
to battery, cables (from Monitor,
Footpad, and battery) can be
plugged in to MAV camera
PowerSpool. Plug 4-prong male
end of Monitor cable into MAV
receptacle labeled “MONITOR.”
Plug 3-pronged male end of
Footpad cable into MAV recepta-
cle labeled “CONTROL.” Plug
female end of 3-hole Power plug
in to MAV receptacle labeled
“POWER.”
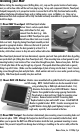
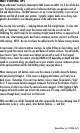
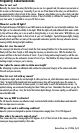
(6a) Attaching Ballast Weights to Camera Housing: The two-piece ballast weights provide the
MAV camera with appropriate weight to keep it running beneath your boat. To install, simply line up
holes in Ballast Weights with the holes in underside of rubber camera (angled edges of weights should
face in, to fit camera attachment point). Attach the weights to camera housing using included bolts and
lock nuts.
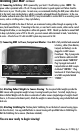
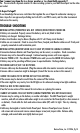
(6b) Attaching Stabilizing Fin: Position plastic Stabilizing Fin on the back of camera housing (oppo-
site from the lens). Line up predrilled holes in camera housing with predrilled holes in Stabilizing Fin.
Bolt the Stabilizing Fin to camera. (Hardware included.)
You are now ready to begin viewing!
Nature Vision, Inc. © 2006, Pg 7