


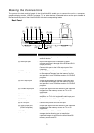
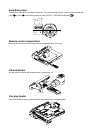

LED Power Button
The LED power button on the control panel of AVerVision530 indicates the status of the unit.
Color Description
Blue : The video signal is outputted to RGB/DVI-I output port.
Green : The video signal is outputted to S-Video/Video output port.
Red : The unit is in standby mode.
Blink : The unit is initializing.
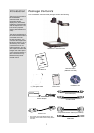
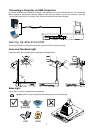
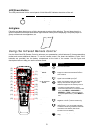
Anti-glare
Place the anti-glare sheet on top of shiny documents to reduce light reflection. The anti-glare sheet is a
special coated film that helps eliminate the light reflection when you are displaying a very shiny object or
glossy surface such as magazines, etc.
U
U
s
s
i
i
n
n
g
g
t
t
h
h
e
e
I
I
n
n
f
f
r
r
a
a
r
r
e
e
d
d
R
R
e
e
m
m
o
o
t
t
e
e
C
C
o
o
n
n
t
t
r
r
o
o
l
l
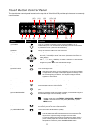
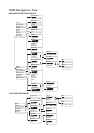
Use the AVerVision530 Remote Control to enhance your presentation, switch between (3) three presentation
modes and access additional features. To use the remote control, first insert the batteries (2 size “AAA”
batteries are provided) into the battery compartment at the back of the remote. Use the figure and
descriptions below to help you use the remote control.
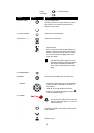
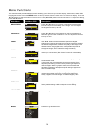
Name Button Function
(1) POWER Turn the unit on/off.
(2) CAMERA
MODE
Switch to Camera mode and display the
image from the AVerVision530’s built-in
CCD camera.
(3) PC MODE
Switch to PC mode and display the video
signal from the RGB input port.
(4) PLAYBACK
MODE
Switch to Playback mode and toggle to
display 16-thumbnail images or the
selected image from the memory source.
: To switch to other memory source,
AVerVision530 must be in camera mode
then press MENU > ADVANCED >
MEMORY > TYPE > select the source
and press (►ENTER) > press MENU to
exit.
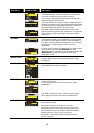
(5) EFFECTS Convert and display the video in BW,
Negative or Color. (camera mode only)
(6) TIMER Display, start and hide the on-screen
display timer. You can toggle to display
or hide the remaining time when the timer
countdown has started. (See Timer
Function for more details)
(1)
(20)
(21)
(19)
(18)
(17)
(16)
(14)
(13)
(15)
(12)
(11)
(10)
(9)
(8)
(7)
(5)
(6)
(4)
(3)
(2)
ENTER
REVERSE
G2
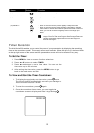
(7) REVERSE
REVERSE
Rotate the image by 180°. (camera mode
only)
9