


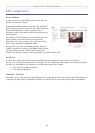

AXIS 212 PTZ - Event Configuration
25
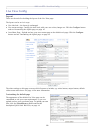
Configuring Motion Detection
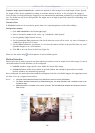
1. Click Motion Detection in the Event Configuration menu.
2. Click the Configure Included Window radio button and click New.
3. Enter a descriptive name under Window name.
4. Adjust the size (drag the bottom right-hand corner) and position (click on the text at the top and drag
to the desired position).
5. Adjust the Object size, History and Sensitivity profile sliders (see table below for details). Any detected
motion within an active window is then indicated by red peaks in the Activity window (the active
window has a red frame).
6. Click Save.
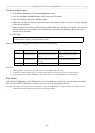
Please see the online help for descriptions of each available option.
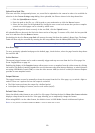
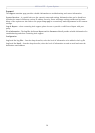
High level Only very large objects
trigger motion detection
An object that appears in the region will
trigger the motion detection for a long
period
Ordinary colored objects on ordinary
backgrounds will trigger the motion
detection
Low level Even very small objects
trigger motion detection
An object that appears in the region will
trigger motion detection for only a very
short period
Only very bright objects on a dark back-
ground will trigger motion detection
Default value Low Medium to High Medium to High
Examples:
• Avoid triggering on small objects in the video image by setting the object size level to high.
• To reduce the number of triggers if there is a lot of movement during a short period of time, select a high history level.
• To only detect flashing light, low sensitivity can be selected. In other cases, a high sensitivity level is recommended.
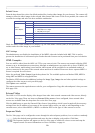
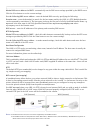
Port Status
Under Event Configuration > Port Status there is a list showing the status for the camera’s input and output.
This is for the benefit of Operators, who have no access to the System Options section.
Example: If the Normal state for a push button connected to an input is set to Open circuit - as long as the button is not pushed, the state
is inactive. If the button is pushed, the state of the input changes to active.
To exclude parts of the Include window, click the Configure Excluded Windows button and position the
Exclude window as required, within the Include window.
Object Size
History Sensitivity