


AXIS Q6045 Mk II PTZ Dome Network Camera
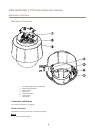
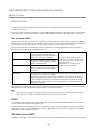
Hardware Overview
NONO
NO
TICETICE
TICE
Due to local regulations or the environmental and electrical conditions in which the product is to be used, a shielded network
cable (STP) may be appropriate or required. All cables connecting the product to the network and that are routed outdoors
or in demanding electrical environments shall be intended for their specic use. Make sure that the network devices
are installed in accordance with the manufacturer’s instructions. For information about regulatory requirements, see
Electromagnetic Compatibility (EMC) on page 2 .
Multi-connector
Terminal connector for connecting external equipment:
• Audio equipment
• Input/Output (I/O) devices
• AC/DC power supply
When connecting external equipment, a multi-connector cable (available from Axis) is required in order to maintain the product’s
NEMA/IP rating. For more information, see Multi-Connector Cable (sold separately) on page 62.
SD Card Slot
An SD card (not included) can be used for local recording with removable storage. For more information, see Technical Specications.
NONO
NO
TICETICE
TICE
To prevent corruption of recordings, the SD card should be unmounted before removal. To unmount, go to Setup > System
Options > Storage > SD Card and click Unmount.
Note
For SD card recommendations see www.axis.com
Control Button
For location of the control button, see Hardware Overview on page 6 .
The control button is used for:
• Resetting the product to factory default settings. See page 60.
• Connecting to an AXIS Video Hosting System service. See page 53. To connect, press and hold the button for about 3
seconds until the Status LED ashes green.
• Connecting to AXIS Internet Dynamic DNS Service. See page53. To connect, press and hold the button for about 3 seconds.
Power Button
Press and hold the power button to temporarily power the product when the dome cover is removed. The power button is also used
with the control button to reset the camera to factory default settings. See page 60.
7