


VG4 Modular Camera System Configuring the IP AutoDome | en 87
Bosch Security Systems, Inc. User’s Manual F.01U.133.268 | 6.0 | 2010.03
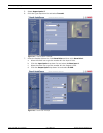
10.32 Display Settings Group 3
Custom Tour Period
Defines the length of time for a custom camera tour. Select the time interval that the
AutoDome waits before moving to the next scene in the tour. The default setting is 5 sec.
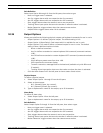
Custom Tour
Allows you to define a custom camera tour by ordering defined scenes to your specifications.
1. Set the custom tour period by selecting a time period from the drop-down list.
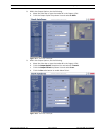
2. Click Download to load the preset scenes. The Available Scenes box displays the preset
scene titles, if defined. If no title is defined, the box displays the default scene title.
3. To define a custom tour:
a. Select a scene in the Available Scenes box.
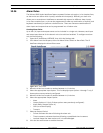
b. Click Left Arrow to add the scene.
c. Continue to add scenes.
d. To remove a scene, select the scene from the Added Scenes box and click the Right
Arrow.
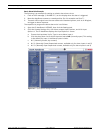
4. To reorder the scenes, select a scene and click the Up or Down arrows.
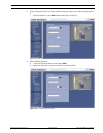
5. Click Upload to load the selected scenes to the camera.
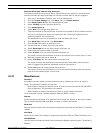
10.33 Advanced Mode: Alarm
10.34 Input Options
The AutoDome provides seven alarm inputs. Each input can be activated by dry contact
devices such as pressure pads, door contacts and similar devices. Options include two types
of physical inputs:
– Inputs 1-7: define the type of physical inputs.
Only alarm inputs 1 and 2 provide tamper detection for breaks or shorts in an alarm
circuit.
– Inputs 8-12: virtual alarm inputs used to define input commands used in a rule definition.
The virtual alarm events (Inputs 8 through 12) can be triggered by one of the following
events:
– None: no trigger event is selected.
– Aux On: triggers alarms with one respective Aux On command.
– Aux Off: triggers alarms with one respective Aux Off command.
– Shot: triggers alarms when the camera is set to one pre-position.
– Tracking: Alarm input option that turns the tracker on when the alarm is activated.
– Motion Detection: triggers alarms when the camera senses motion.
– IVA/MOTION+: triggers alarms when IVA is activated.
– Click the Alarm States link in the left pane to view a status of each alarm.
Type
To define the type of physical input:
1. Select Input Option 1 through 7 from the left pane.
2. Select one of the following alarm inputs:
– N.O. (Normally Open, dry contact).
– N.C. (Normally Closed, dry contact).
– N.C.S. (Normally Closed Supervised contact, available only for alarm inputs 1 and 2).
– N.O.S. (Normally Open Supervised contact, available only for alarm inputs 1 and 2).
3. Type an alphanumeric name for the input, up to 32 characters.
4. Check Activate Trigger to enable the alarm input to trigger an alarm email and a
connection.