


12
13
LANGUAGE: With “Language” highlighted in the Setup submenu, hold the Right button to see
the options. Select your preferred language for all display menus/messages, (using Delete/Copy
buttons) then push the Right button to confirm and return to Setup.
AUTO OFF: Select “Auto Off” in the Setup submenu, then hold the Right button for 2 seconds.
Use the Left or Right button to select “Disable”, or your choice of 1 min, 2 min, or 3 min. This
determines the length of delay before the Viewer will automatically shut off to save battery power,
after the last time any button has been pushed. Press and hold the Right button to confirm your set
-
ting and return to the Setup submenu.
CLOCK SET: Select “Clock Set” in the Setup submenu, select “OK” , then hold the Right button
for 2 seconds. To change the date/time settings, use the Left/Right buttons to move around to the
field (day, hour, etc) you wish to change, and use the Delete/Copy buttons to scroll the setting up or
down. At any time when you have finished changing the settings, press and hold the Right button
to confirm the settings and return to the Setup submenu.
EXIT: To exit the Setup submenu at any time and return to the main menu display screen, select
“Exit” and hold down either the Left or Right button. This returns you to the main menu-press and
hold the Left button to return to normal viewing mode.
SETUP (Submenu)-continued
Using the Viewer With A Computer (Card Reader Function)
The USB port next to the card slots on the right side of the Viewer allows it to function as an SD
“card reader” when connected with the included USB cable to any computer (Windows 2000, ME, or
XP; Mac OS 9 or higher. Check www.bushnell.com for future Windows 98/98SE driver availability).
The connected Viewer will operate just like an external hard drive, from which your photos may be
accessed for viewing, editing and/or storing on your computer.
Transferring Photos to Your PC - Step by Step
1. Make sure the Viewer power is on and connect the supplied cable to the Viewer’s USB port (open
the door on the right side of the Viewer), then directly to a main USB port on your computer-do not
use front panel/keyboard USB ports or unpowered “hubs”.
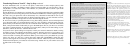
2. The LCD display will show that the Viewer has been recognized as a standard “USB Mass Storage”
device. This means that the camera files can be easily viewed, edited, or copied to your hard drive,
just as if they were stored on an external hard drive or a CD-ROM.
3. (This step is not required with Windows XP, simply use the on-screen options to view, copy or
edit your photos). Open “My Computer” or Windows Explorer. The Viewer will be shown as a new
“Removable Disk” with an unused drive letter assigned to it. Double click this new “Disk” icon, then
open any folder or folders found inside to get to your photo files. Single clicking any file should show
a small preview image. (Mac users: the Viewer will be seen as a new drive icon on your desktop.)