


105
1
2
3
4
5
6
7
8
Cover
Preliminary Notes
and Legal Information
Contents: Basic
Operations
Advanced Guide
Camera Basics
Smart Auto
Mode
Other Shooting
Modes
Playback Mode
Setting Menu
Accessories
Appendix
Index
Basic Guide
P Mode
A2600
[h]ashesonthescreenwhentheshutterbuttonispressed,and
shooting is not possible (=
36).
A1400
[Chargingtheash]isdisplayedwhentheshutterbuttonispressed,
and shooting is not possible (=
36).
[
] is displayed when the shutter button is pressed halfway (=
41).
•Settheashmodeto[h] (=
62).
•Increase the ISO speed (=
56).
Shots are out of focus.
•Press the shutter button halfway to focus on subjects before pressing it all the way
down to shoot (=
29).
•Make sure subjects are within focusing range (=
119).
•Set [Lamp Setting] to [On] (=
44).
•Conrmthatunneededfunctionssuchasmacroaredeactivated.
•Try shooting with focus lock or AF lock (=
60, 62).
No AF frames are displayed and the camera does not focus when the
shutter button is pressed halfway.
•To have AF frames displayed and the camera focus correctly, try composing the
shot with higher-contrast subject areas centered before you press the shutter button
halfway. Otherwise, try pressing the shutter button halfway repeatedly.
Subjects in shots look too dark.
•Settheashmodeto[h] (=
62).
•Adjust brightness by using exposure compensation (=
54).
•Adjust contrast by using i-Contrast (=
56, 78).
•Use AE lock or spot metering (=
55).
Subjects look too bright, highlights are washed-out.
•Settheashmodeto[!] (=
41).
•Adjust brightness by using exposure compensation (=
54).
•Use AE lock or spot metering (=
55).
•Reduce the lighting on subjects.
Shotslooktoodarkdespitetheashring(=
35).
•Shootwithinashrange(=
119).
•Increase the ISO speed (=
56).
Subjectsinashshotslooktoobright,highlightsarewashed-out.
•Shootwithinashrange(=
119).
•Settheashmodeto[!] (=
41).
Whitedotsorsimilarimageartifactsappearinashshots.
•Thisiscausedbylightfromtheashreectingoffdustorairborneparticles.
Shots look grainy.
•Lower the ISO speed (=
56).
•High ISO speeds in some shooting modes may cause grainy images (=
56).
Subjects are affected by red-eye (=
43).
•Set [Lamp Setting] to [On] (=
44) to activate the red-eye reduction lamp (=
4)
inashshots.Notethatwhilethered-eyereductionlampison(foraboutone
second), it is not possible to shoot, because the lamp is counteracting red-eye. For
best results, have subjects look at the red-eye reduction lamp. Also try increasing the
lighting in indoor scenes and shooting at closer range.
•Edit images using red-eye correction (=
78).
Recording to the memory card takes too long, or continuous shooting
is slower.
•Use the camera to perform low-level formatting of the memory card (=
83).
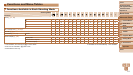
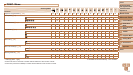
Shooting settings or FUNC. menu settings are not available.
•Available setting items vary by shooting mode. Refer to “Functions Available in Each
Shooting Mode”, “FUNC. Menu”, and “Shooting Menu” (=
111 – 114).