


65
1
2
3
4
5
6
7
8
Cover
Preliminary Notes
and Legal Information
Contents: Basic
Operations
Advanced Guide
Camera Basics
Smart Auto
Mode
Other Shooting
Modes
Playback Mode
Setting Menu
Accessories
Appendix
Index
Basic Guide
P Mode
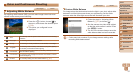
Still Images
Magnifying the Area in Focus
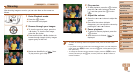
You can check the focus by pressing the shutter button halfway, which will
enlarge the portion of the image in focus in the AF frame.
1 Congurethesetting.
Press the <n> button, choose [AF-
Point Zoom] on the [4] tab, and then
choose [On] (=
31).
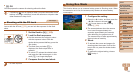
2 Check the focus.
Press the shutter button halfway. The
face detected as the main subject is now
magnied.
To restore the original setting, choose
[Off] in step 1.
•Theareainfocuswillnotbemagniedwhenyoupresstheshutter
button halfway if a face was not detected, if the person is too close
to the camera and their face is too large for the screen, or if the
camera detects subject movement.
•The display will not magnify when using the digital zoom (=
38) or Tracking
AF (=
60).
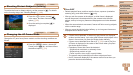
Still Images
Changing the Image Display Style After Shots
You can change how long images are displayed and what information is
displayed immediately after shooting.
Changing the Image Display Period After Shots
1 Access the [Review image after
shooting] screen.
Press the <n> button, choose
[Review image after shooting] on the
[4] tab, and then press the <m> button
(=
31).
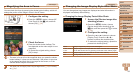
2 Congurethesetting.
Press the <o><p> buttons to choose
[Display Time]. Press the <q><r>
buttons to choose the desired option.
To restore the original setting, repeat this
process but choose [Quick].
Quick Displays images only until you can shoot again.
2 sec., 4 sec.,
8 sec.
Displaysimagesforthespeciedtime.Evenwhiletheshotisdisplayed,
you can take another shot by pressing the shutter button halfway again.
Hold Displays images until you press the shutter button halfway.
Off No image display after shots.