


5
Introduction
E
Using this Manual
Thank you for purchasing the Canon ELURA70/ELURA65/ELURA60. Please read this
manual carefully before you use the camcorder and retain it for future reference.
Change the display language before you begin ( 76).
Symbols and References Used in This Manual
❍ : Precautions related to the camcorder operation.
❍ : Additional topics that complement the basic operating procedures.
❍ : Reference page number.
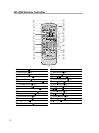
❍ Capital letters are used to refer to buttons on the camcorder or the wireless controller.
❍ [ ] are used to refer to menu items displayed on the screen.
❍ “Screen” refers to the LCD and the viewfinder screen.
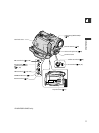
❍ Please note that the illustrations mainly refer to the ELURA70 (illustrations of the battery
pack show the NB-2LH supplied with the ELURA65 and ELURA60).
: Function can be used in this mode.
: Function cannot be used in this mode.
Trademark Acknowledgements
• Canon and Bubble Jet are registered trademarks of Canon Inc.
• D is a trademark.
• is a trademark.
• Windows
®
is either a registered trademark or trademark of Microsoft Corporation in the United States
and/or other countries.
• Macintosh and Mac OS are trademarks of Apple Computer, Inc., registered in the United States and
other countries.
• Other names and products not mentioned above may be registered trademarks or trademarks of their
respective companies.
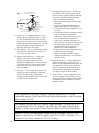
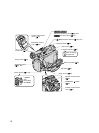
CAMERA
CAMERA
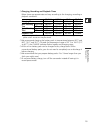
Operating Mode POWER Switch TAPE/CARD Switch
CAMERA CAMERA b (TAPE)
PLAY (VCR) PLAY (VCR) b (TAPE)
CARD CAMERA CAMERA (CARD)
CARD PLAY PLAY (VCR) (CARD)
Basic Functions -
Preparations
E
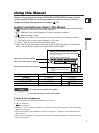
Setting the Time Zone, Date and Time
Set the time zone, date and time when you first start using your camcorder, or when
you have replaced the backup battery.
Setting the Time Zone/Daylight Saving Time
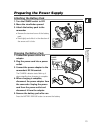
1. Press the MENU button to open the menu.
2. Turn the SET dial to select [SYSTEM] and press the
SET dial.
3. Turn the SET dial to select [T.ZONE/DST] and press
the SET dial.
CARD PLAYCARD CAMERAPLAY (VCR)CAMERA
T.ZONE/DST•••N.Y. SYSTEM
( 38)
Button and switches to be operated
Operating modes (see below)
Menu item and its default setting.
1_D82NTSC_E(03-12) 1/30/04 14:24 Page 5