


20
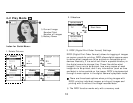
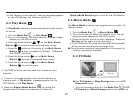
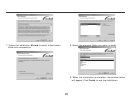
6-1 Setup Mode
In Setup Mode, you can adjust the camera’s basic
functions, including Image Size, Image Quality, Self-timer,
White Balance, EV Compensation, OSD Language,
Date/Time, Preset Settings, Format Media, and TV-Out. To
set these options:
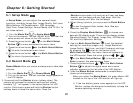
1. Turn the Mode Dial
to Setup Mode .
2. Turn on the camera. The red LED will blink, and then the
setup screen will show on the LCD monitor.
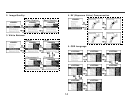
3. Press the arrow button
/ on the Multi-Select
Button
to move and select the menu items.
4. Press the arrow button
on the Multi-Select Button
to enter the selected menu items.
5. Press the arrow button on the Multi-Select Button
to return the previous menu.
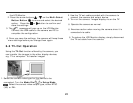
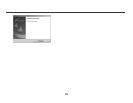
6-2 Record Mode
Record Mode offers you a quick and easy way to take ideal
pictures.
1. Turn the Mode Dial
to Record Mode .
2. Turn on the camera. The last recorded image appears on
the LCD display.
3. Press and hold the Shutter button halfway down. The
camera will process the exposure settings and yellow
brackets "[ ]" will appear in the center position of LCD
monitor. Continues to press and hold the Shutter button
halfway down to keep the same value. Press the
Shutter button down fully and you will hear two beep
sounds, one low beep and one high beep. Hold the
camera steady until after the two beeps.
4. When taking a picture, you can press the Flash Button
to set the desired flash modes: Auto, Red-eye
reduction, and Off.
5. Press the Display Mode Button
to choose your
desired LCD display mode. There are five display modes:
Standard Display, Full Display, Image Only, LCD Monitor
Off, and Only Operation Settings.
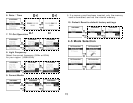
6. Use the Multi-Select Button
to set the detailed
settings for recording images, e.g., Image Resolution,
Image Quality, Self-timer, and Light Frequency settings.
By pressing the
button on the center of the
Multi-Select Button, the menu items will appears on
the LCD monitor. Press the arrow buttons
/ / /
on the Multi-Select Button to move to, and
Enter to select, the desired menu items.
7. Press the arrow buttons
/ on the Multi-Select
Button
to adjust the digital zoom and a zoom
indicator appears on the left side of the LCD Monitor.
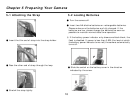
8. Slide the Macro Button downwards to enable Macro
(close-up) photography.
When you select the Macro Mode, the green Macro LED
located on the top of the LCD monitor will light up.
※ If the low battery power icons appears on the LCD
Monitor, replace the batteries immediately to keep the
camera operating normally.
Chapter 6: Getting Started