


17
Using the Camera
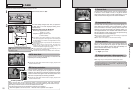
2
2
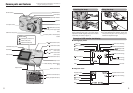
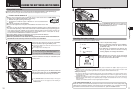
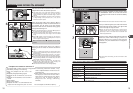
1Press the “POWER” button to turn the camera
on.
2Set the Mode switch to “q”.
h Focal range
Approx. 60 cm (2.0 ft.) to infinity
●
!
Use Macro mode for subjects closer than 60 cm (2.0 ft.)
(➡P.27).
●
!
When “7”, “-”, “q”
or “
=” appears, see P.82.
Brace your elbows against your sides and hold the
camera with both hands. Position your right thumb
so that it is handy for using the zoom.
●
!
Moving the camera while shooting gives a blurred picture
(camera shake). Use a tripod to prevent camera shake,
particularly for shots in the dark when the selected flash
mode is Suppressed flash.
●
!
There may be some uneven brightness at the lower edge of
the LCD monitor. This is normal and does not affect the
image.
3
Hold the camera so that your fingers or the strap do
not cover the lens or flash. If the lens or flash is
obscured, the brightness (exposure) of your shot
may be incorrect.
●
!
Check that the lens is clean. If it is dirty, clean the lens as
informed on P.78.
●
!
If the flash is used in dusty conditions or when it is snowing,
white dots may appear in the image due to flash reflecting off
the dust particles or snowflakes. Use Suppressed flash mode
to fix the problem.
4
Press “[ (a)” to zoom in. Press “] (b)” to zoom
out. A zoom bar appears on the LCD monitor.
h Optical zoom focal length
(35 mm camera equivalent)
Approx. 35 mm to 105 mm
Max. zoom scale: 3×
●
!
See P.55 for information on procedures for using Digital
zoom.
121 2N
Zoom bar
16
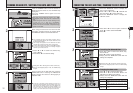
E R AS
A S
E O K?
F RAME
FRAME
F RAME
Y ES
YES
Y ES
C A N CE L
CANCEL
C A N CE L
YES
YES
YES
C A N C E L
CANCEL
C A N C E L
100
-
0009
10
10
0
-
0009
009
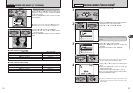
Press this button to stop a
procedure midway through.
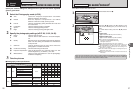
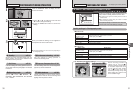
Up, down, left and right are indicated by black triangles in the Owner’s Manual. Up or down is
shown as “a” or “b”, and left or right is shown as “d” or “c”.
Using the Menus
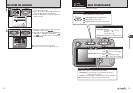
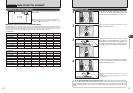
DISP/BACK button
1Displaying the menu.
Press the “MENU/OK” button.
4Confirming the setting.
Press the “MENU/OK” button.
2Selecting a menu option.
Press the left or right arrow on the dc
button.
3Selecting a setting.
Press the up or down arrow on the f
switch.
Instructions for the next step in the procedure
appear at the bottom of the LCD monitor. Press
the button indicated.
Press the “MENU/OK” button to erase the
displayed frame. To cancel erasing, press the
“DISP/BACK” button.
◆ Displaying the on-screen help ◆
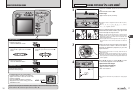
BASIC OPERATION GUIDE
1
01
02
TAKING PICTURES
(
a AUTO MODE
)
PHOTOGRAPHY MODE
Continued