


33
Advanced Features
3
32
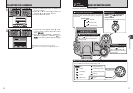
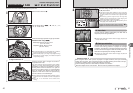
TAKING PICTURES — SELECTING THE CAMERA SETTINGS
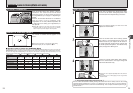
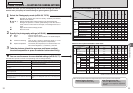
PHOTOGRAPHY FUNCTIONS
d Flash
f
Continuous
shooting
x Auto flash
YESP.39
P.41
P.41
P.42
P.42
P.42
P.44
P.44
P.44
P.45
P.30
P.46
NO NO NO NO YES YES YES YES NO
YES YES NO YES NO YES NO NO NO NO
YES YES NO NO NO YES YES YES YES NO
YES YES NO YES NO YES YES YES YES NO
NO YES NO NO YES YES NO YES NO NO
NO YES
YES
NO
YES
NO
YES
NO
NO NO YES YES NO YES NO NO
YES YES YES YES YES NO
NO YES YES YES YES NO
YES YES YES YES YES NO
YES NO NO NO NO NO
YES YES YES YES YES NO
NO YES YES YES NO NO
b Red-eye reduction
d Forced flash
c Slow synchro
n
Red-eye reduction + Slow synchro
f Top 3-frame
j Auto bracketing
k Final 3-frame
h
Long-period (up to 40 frames)
e Macro
Focus mode (S-AF/MF/C-AF)
D Exposure compensation
P.49
YES NO
fi Increasing monitor brightness
B
m
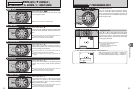
PORTRAIT
,
LANDSCAPE
.
SPORTS
/
NIGHT SCENE
NM<>
r
Photography mode
Function
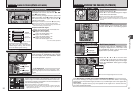
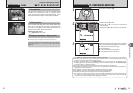
■ List of functions available in each modeConsider the scene you are photographing and the sort of image you want to
achieve when you specify the camera settings. A general guide is given below.
1
Select the Photography mode (➡P. 34-38, 75-76).
B
Specifies all settings other than the Quality, Sensitivity and FinePix
COLOR on the camera.
m, ,, ., / Selects the best Scene position setting for the scene being shot.
N/M/< Changes the aperture or shutter speed setting so that the action is
frozen, the flow of the motion is conveyed, or the background is out of
focus.
> Adjust all the camera settings yourself.
r Record a movie.
2
Specify the photography settings (➡P.39-49).
e
Macro Uses for close-up shots.
d
Flash Uses for shots in dark locations or for backlit subjects,
etc.
f
Continuous shooting Uses to take a series of continuous shots or to use
auto bracketing (with exposure compensation).
D
Exposure compensation
Use the AE (Auto-exposure) as a reference value of 0.
This function brightens (+) or darkens (–) the shot.
3
Take the pictures (check the exposure and focus ➡ adjust
the shot composition ➡ press the shutter button down fully).
★
You can use the menus for more detailed settings (➡P.50-59, 77).
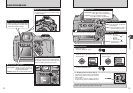
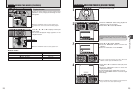
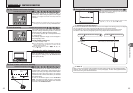
The table below provides a number of sample settings. Use the settings effectively.
To achieve this result Sample settings
To express the motion of the subject
Set the Mode dial to “M” and select a slow shutter speed. (Use a
tripod to prevent camera shake.)
To freeze the subject's movement
Set the Mode dial to “M” and select a fast shutter speed.
To make the subject stand out by having the background
out of focus
Set the Mode dial to “<” and select a wide aperture setting.
To get a very large depth of focus
Set the Mode dial to “<” and select a narrow aperture setting.
To prevent the image from having a red or blue cast
due to the light source
Change the “White balance” setting in the photography menu.
To prevent missing snapshot opportunities Take pictures in AUTO mode (see “Using the Camera”).
To prevent the subject from being overexposed or
underexposed and to show the substance and textures
of the subject clearly.
Use exposure compensation.
Select (+) if the background is pale and (–) if the background is
dark.
✽ The flash cannot be used for continuous shooting.
When shutter speed and aperture adjustments alone do not give the correct exposure:
When the image is too bright
Lower the “
S” sensitivity setting.
When the image is too dark
Raise the “S” sensitivity setting.
Use flash or the brightness adjustment
function.
NO YES YES YES YES NO
NO YES YES YES YES NO
NO YES YES YES YES NO
) MULTI
_ SPOT
+
AVERAGE
✽1 AUTO can only be set in “B” mode.
✽ AREA and continuous AF(C-AF) cannot be used together.
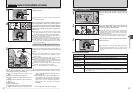
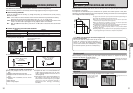
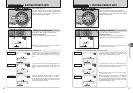
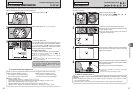
Menu
options
* Self-timer
A White balance
H
AF
mode
;
CENTER
œ MULTI
† AREA
YESOFF
AUTO
CENTER
MULTI
±1/3EV
NORMAL
±0P.59
P.59
P.59
P.58
P.58
P.58
P.58
P.57
P.57
P.55
P.54
P.52
P.51
P.50,P.77
YES YES YES YES YES NO
NO NO YES YES YES YES NO
NO NO YES YES YES YES NO
NO NO YES YES YES YES NO
NO NO YES YES YES YES NO
NO
NO
NO
NO NO YES YES YES YES NO
NO NO YES YES YES YES NO
NO NO YES YES YES YES NO
j Bracketing
G Sharpness
z Flash
(brightness adjustment)
B
Factory
Defaults
m, ,, ., /
NM<>
r
■ List of menu options available in each mode
FinePix
photo
mode
4 N
AUTO
✽1
p-STANDARD
YES
YES
YES YES YES YES YES YES
NOYES YES YES YES YES
YES YES YES YES YES YES NO
y Quality
S ISO
J FinePix COLOR
ç
Photo
metry