AUDIO
IN
VIDEO
IN
AUDIO
IN
L
R
VIDEO
IN
Back of
Mono VCR or
TV Monitor
Back of
Stereo VCR or
TV Monitor
Y-Adapter*
White
Audio
Plug
Yellow Video Plug
Audio/Video
Cable
Audio/Video
Cable
White
Audio
Plug
Yellow
Video
Plug
OR
Video Jack
Audio Jack
REW PLAY F.FWD EJECT
STOP PAUSE BLANK
V
A
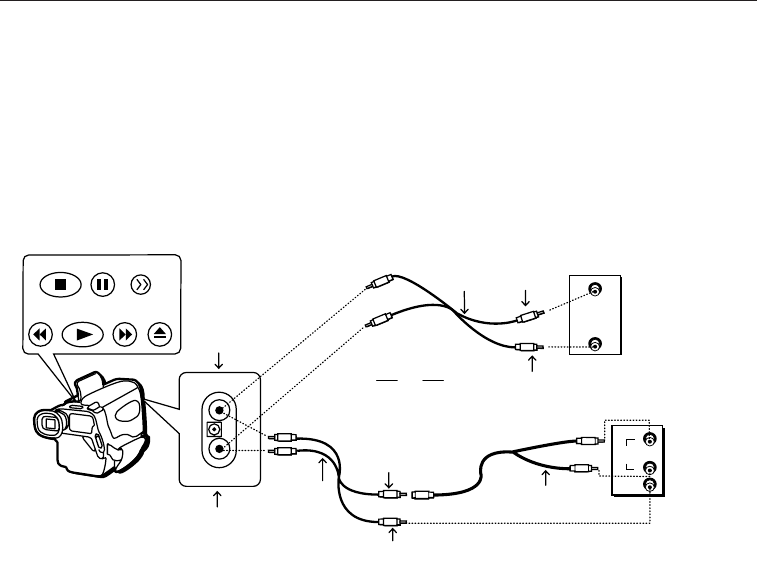
Playback on TV (or VCR) with AUDIO/VIDEO IN Jacks
To connect your camcorder to a TV monitor (or VCR) with AUDIO/VIDEO IN jacks,
you need an audio/video cable and maybe a Y-adapter. If your TV is already
connected to a VCR, just attach the camcorder to the VCR.
22
Playback
The basic playback features are described in this section of the manual. Before you
can use these features, you must attach your camcorder to a TV (or VCR) to view the
playback. Check order form on page 5 for optional accessories.
Playback Operation
1. Camcorder connected to TV:
Turn on the TV and tune it to the
video input channel.
Camcorder connected to VCR that
is connected to TV:
Turn on VCR and place it in the “line”
or “camera mode”. (If your VCR does
not have a “line” or “camera mode”,
consult the VCR owner’s manual.)
Operate the TV as you normally do to
see the signal coming from the VCR.
2. Attach a power supply and turn on the
camcorder.
3. Insert a tape.
4. Press the PLAY/CAM button to turn
on PLAY mode.
The green indicator lights.
5. Press PLAY.
During playback, use the playback
features described on page 24.
6. Press STOP when you are finished.
Tip: This same connection can be used if you
want to watch what the camcorder is seeing or
recording on the TV screen. Remember to
remove the tape unless you are recording. Just
place the PLAY/CAM button in the CAMERA
mode and press the thumb trigger.
* Optional accessories are available from your dealer, local electronics store, or mail order. Order form is on page 5.


