VIDEO PLAYBACK
VIDEO RECORDING & PLAYBACK
EN 19
MasterPage: Video_Right
To choose whether or not the following displays
appear on the connected TV
● Date/Time
Set “DATE/TIME” to “AUTO”, “ON” or “OFF”. (੬ pg. 27, 31)
Or, press DISPLAY on the remote control to turn on/off the
date indication.
● Time Code
Set “TIME CODE” to “ON” or “OFF”. (੬ pg. 27, 31)
● Indications other than date/time and time code
Set “ON SCREEN” to “OFF”, “LCD” or “LCD/TV”.
(੬ pg. 27, 31)
NOTES:
● It is recommended to use the AC Adapter as the power
supply instead of the battery pack. (੬ pg. 11)
● To monitor the picture and sound from the camcorder
without inserting a tape or memory card, set the
camcorder’s Power Switch to “A” or “M”, then set your TV
to the appropriate input mode.
● Make sure you adjust the TV sound volume to its minimum
level to avoid a sudden burst of sound when the camcorder
is turned on.
The Full-Function Remote Control Unit can operate this
camcorder from a distance as well as the basic
operations (Playback, Stop, Pause, Fast-Forward and
Rewind) of your VCR. It also makes additional playback
functions possible. (੬ pg. 20)
Installing The Battery
The remote control uses one
lithium battery (CR2025).
1 Pull out the battery holder
by pushing the lock tab.
2 Insert the battery in the
holder, and be sure to have the
“+” mark visible.
3 Slide the holder back in until
you hear a click.
Beam Effective Area (indoor use)
When using the remote control,
be sure to point it at the remote
sensor. The transmitted beam’s
approximate effective distance for
indoor use is 5 m.
NOTE:
The transmitted beam may not be
effective or may cause incorrect
operation when the remote sensor is directly exposed to
sunlight or powerful lighting.
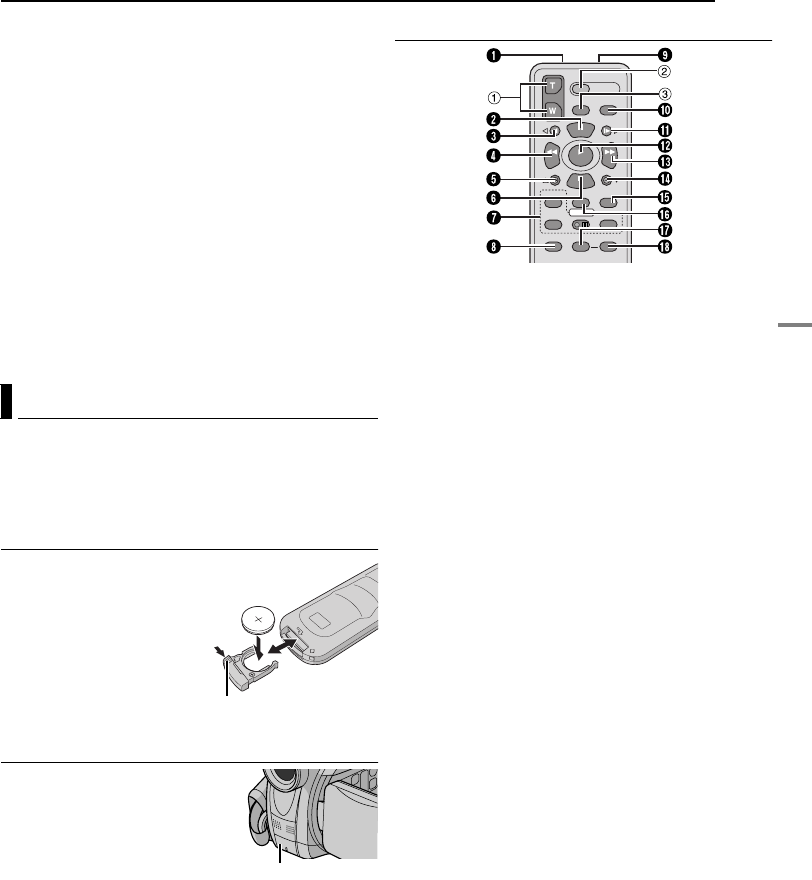
Buttons And Functions
A Infrared beam transmitting window
● Transmits the beam signal.
The following buttons are available only when the
camcorder’s Power Switch is set to “PLAY”.
B PAUSE Button
● Pauses the tape (੬ pg. 20)
C SLOW Rewind Button (੬ pg. 20)
Left Button (੬ pg. 20)
D REW Button
● Rewind/Reverse Shuttle Search on a tape (੬ pg. 18)
● Displays previous file in a memory card (੬ pg. 22)
E INSERT Button (੬ pg. 40)
Up Button (੬ pg. 20)
F STOP Button
● Stops the tape (੬ pg. 17)
● Stops Auto Playback (੬ pg. 22)
G R.A.EDIT Buttons (੬ pg. 41 – 44)
H FADE Button (੬ pg. 43)
I PAUSE IN Connector (੬ pg. 42)
J DISPLAY Button (੬ pg. 19, 37, 42)
K SLOW Forward Button (੬ pg. 20)
Right Button (੬ pg. 20)
L PLAY Button
● Starts Playback of a tape (੬ pg. 17)
● Starts Auto Playback of images in a memory card
(੬ pg. 22)
M FF Button
● Forward/Forward Shuttle Search on a tape (੬ pg. 18)
● Displays next file in a memory card (੬ pg. 22)
N A. DUB Button (੬ pg. 40)
Down Button (੬ pg. 20)
O MBR SET Button (੬ pg. 41)
P SHIFT Button (੬ pg. 20, 41)
Q EFFECT Button (੬ pg. 20)
R EFFECT ON/OFF Button (੬ pg. 20)
The following buttons are available when the camcorder’s
Power Switch is set to “A” or “M”.
a Zoom (T/W) Buttons
Zoom in/out (੬ pg. 16, 20)
(Also available with the Power Switch set to “PLAY”)
b START/STOP Button
Functions the same as the Recording Start/Stop
Button on the camcorder.
c S.SHOT Button
Functions the same as SNAPSHOT on the camcorder.
(Also available with the Power Switch set to “PLAY”)
Playback Using The Remote Control
1
1
2
3
Lock tab
Remote sensor
GR-D231PAL.book Page 19 Thursday, January 22, 2004 2:57 PM


