


LCD Screen Display
o
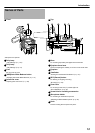
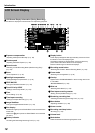
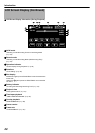
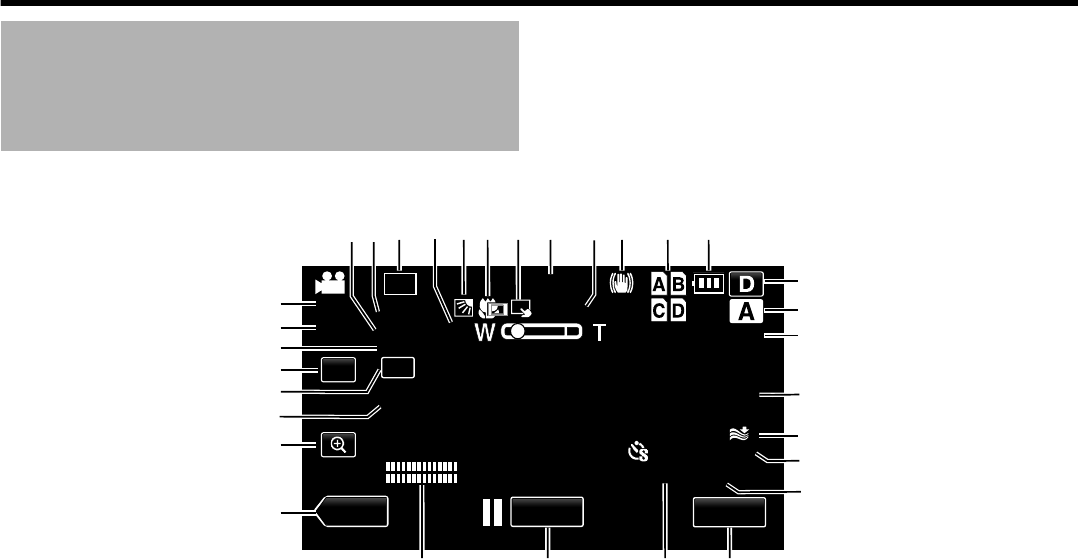
LCD Screen Display Information (During Recording)
All the items are displayed in the illustration for explanatory purposes.
.
10X
10X
60P
UXP
4K
0:00:00:00
0:00:00[000:00]
WT
Overlap
AF
40SEC
PLAY
REC
MENU
10:45AM
12dB
FAW
CH1
CH2
1/4000
±0.0
F3.4
u
t
s
r
q
p
o
n
12 3 4 56 7 8 9 0 a b
c
d
e
f
g
h
i
mlkj
A Exposure compensation
“Adjusting the Exposure Manually” (A p. 38)
B Shutter speed
“Adjusting the Shutter Speed” (A p. 39)
C Record mode
“Selecting a Video Recording Mode (HD Recording Only)”
(A p. 33)
D Zoom
“Zoom Operation” (A p. 35)
E Backlight compensation
“Setting Backlight Compensation” (A p. 43)
F TELE MACRO
“Using the Tele Macro Feature” (A p. 37)
G Touch Priority AE/AF
“Setting Touch Priority AE/AF” (A p. 43)
H Time
“Clock Setting” (A p. 26)
I Time-lapse recording
“Setting Time-lapse Recording” (A p. 44)
J Image Stabilizer
“Using the Image Stabilizer Feature” (A p. 43)
K Slot display
4K2K mode: lights up when SDHC/SDXC cards are inserted into
all the slots.
1920 mode: E lights up when an SDHC/SDXC card is inserted
into slot A.
L Battery indicator
“Checking the Remaining Recording Time” (A p. 44)
M Display button
Some displays disappear after approximately 3 seconds. Press
this button to show the displays again.
The displays appear for approximately 3 seconds with every
press. Press and hold this button to fix the displays.
Press this button again to release the displays.
N Recording mode button
“Selecting the Full Auto / Manual Shooting Mode” (A p. 32)
O Focus mode
“Selecting a Focusing Mode” (A p. 32)
P Overlap
Appears when “EDGE BLENDING” in the recording menu is set
to “16 PIXEL”.
“EDGE BLENDING” (A p. 62)
Q Wind cut
“Reducing Wind Noise” (A p. 46)
R Time-lapse recording counter
“Setting Time-lapse Recording” (A p. 44)
S Remaining recording time
“Checking the Remaining Recording Time” (A p. 44)
T Menu button
“Operating the Menu” (A p. 59)
U Scene counter
V Recording start/stop button
“Shooting” (A p. 33)
W Volume level
X Mode button
Switches between the Recording/Playback mode.
Introduction
18