38 EN
EXP.
0
EXP.
6
EXP.
6
0
FOCUS
EXPOSURE MANUAL
OFF
AUTO
AUTO
W. BALANCE
FADER
/ WIPE
4
END
OFF
TO MODE MENU
P. AE
/ EFFECT
A M
P
L
A
Y
O
F
F
C
A
M
E
R
A
5
S
RECORDING
Advanced Features (cont.)
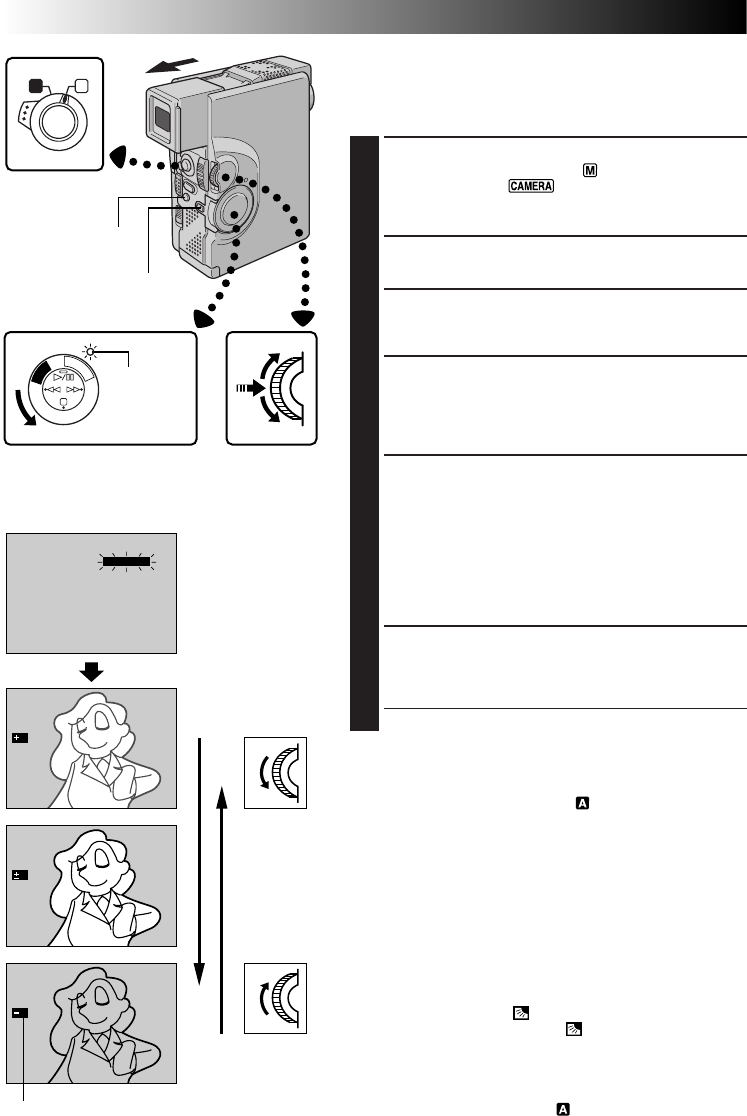
Exposure Control
This feature automatically adjusts the iris for the best
available picture quality, but you can override and make
the adjustment manually.
1
SELECT OPERATION MODE
Set the Operation Switch to “ ”. Then, set the
Power Switch to “ ” or “5S” while pressing
down the Lock Button. Pull out the viewfinder fully or
open the LCD monitor fully.
2
ACCESS RECORDING MENU
Press MENU/SET. The Recording Menu appears.
3
ACCESS “EXPOSURE”
Rotate MENU/SET to move the highlight bar to
“EXPOSURE”, then press it.
4
ACCESS EXPOSURE CONTROL
Rotate MENU/SET to display “MANUAL”, then press
it. The Recording Menu disappears. “EXP.” and the
highlight bar on the exposure control indicator are
displayed.
5
ADJUST EXPOSURE
To brighten the image . . .
.... rotate MENU/SET upward. The exposure control
indicator increases (maximum +6).
Go to step 6.
To darken the image . . .
.... rotate MENU/SET downward. The exposure
control indicator decreases (maximum –6).
Go to step 6.
6
END ADJUSTMENT OF EXPOSURE
Press MENU/SET. Exposure adjustment is complete. The
indication “EXP.” changes to “MANUAL” and the
highlight bar on the exposure control indicator goes out.
•If you want to reset the exposure, repeat step 2.
To Return To Automatic Exposure Control . . .
.... rotate MENU/SET to display “AUTO” then press it in
step 4. The exposure control indicator disappears. Or
set the Operation Switch to “ ”.
NOTES:
●
After the Power Switch is set to “OFF”, Exposure Control is reset
to “AUTO”.
●
Manual exposure adjustment is recommended in the following
situations:
•
When shooting using reverse lighting or when the background
is too bright.
•
When shooting on a reflective natural background such as at
the beach or when skiing.
•
When the background is overly dark or the subject light.
To Brighten The Subject Quickly . . .
.... press BACK LIGHT. is displayed and the subject is
brightened. If pressed again, disappears and the
brightness returns to the previous level. The value shown
by the exposure control indicator plus 2 is the back light
compensation level. The maximum compensation level
is +6. Back light compensation is also available when the
Operation Switch is set to “ ”.
Recording Menu
Exposure control indicator
Display
Power Switch
To brighten the image
To darken the image
MENU/SET Dial
Lock Button
Power lamp
Operation Switch
BACK LIGHT Button


