


EN 11
T
W
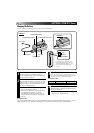
WIDE MODE
ZOOM
DIS
GA I N UP
TO FADER / WIPE MENU
TO P.AE / EFFECT MENU
TO DATE / TIME MENU
TO SYSTEM MENU
END
OFF
20X
OFF
AGC
ITEM ZOOM SW.
SET SET BUTTON
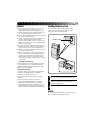
ON SCREEN
DISPLAY
DATE/T IME
END
OFF
OFF
25. 12. 96
17:30
ITEM ZOOM SW.
SET SET BUTTON
FOCUS
EXP.
WB
PRO
AUTO
SET
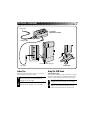
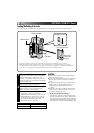
Date/Time Settings
If you set the date and time beforehand, the data will automatically be recorded separately from the video
signal.
Even if the date and time do not appear during recording, you can display them on the screen or remove
them from the screen at any time during playback.
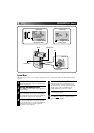
4
INPUT DATE AND TIME
Place the pointer next to “DATE/TIME” by
sliding the Zoom Lever. Press SET and “Day”
begins blinking.
Using the Zoom Lever (slide toward “+” to increase
and toward “–” to decrease), input the day. Press
SET. Repeat the procedure to input the month, year,
hour and minute. Press SET when the pointer is next
to “END” to exit.
NOTE:
If you don’t exit the Date/Time Menu, the clock
display will not move but the camcorder’s internal
clock continues to operate. Once you close the
menu, the date and time in the viewfinder begin
operation from the current date and time, with no
delay or loss.
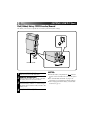
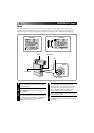
1
SELECT OPERATION MODE
Set the Power Dial to “REC” and the Select
Dial to “MANUAL”.
2
ACCESS RECORDING MENU
Press MENU. The Recording Menu appears in
the viewfinder.
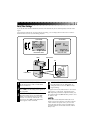
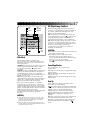
3
ACCESS DATE/TIME MENU
Place the pointer next to “TO DATE/TIME
MENU” by sliding the Zoom Lever. Slide
toward “+” to move up and toward “–” to
move down. Press SET and the Date/Time
Menu appears in the viewfinder.
SET
POWER DIAL
MANUAL
ZOOM LEVER
MENU
VIEWFINDER
RECORDING MENU
VIEWFINDER
DATE/TIME MENU