


EN 59
@
0
!
%^
&
*
(
)
e
t
y r
wq
#
$
1
2
3
4
5
6
7
8
9
M
RTC
S
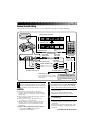
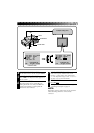
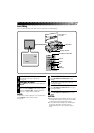
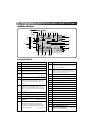
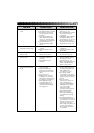
CONTROLS, INDICATIONS AND CONNECTORS
Main Unit
@ Remaining Battery Power Indicator (੬ pg. 59)
# “No Tape Loaded” Indicator
$ Tape Advance Buttons (੬ pg. 21)
% Stereo Microphone
^ Power Lamp (੬ pg. 20)
& OPEN/EJECT Switch (੬ pg. 12)
* Zoom Lever (੬ pg. 11)
( Select Dial (੬ pg. 15)
) SET Button (੬ pg. 16)
q Battery Cover (੬ pg. 9)
w RECORDING START/STOP Button (੬ pg. 20)
e Power Dial (੬ pg. 11)
r Diopter Adjust Lever (੬ pg. 13)
t Tripod Mounting Socket
y Hand Strap Eyelet (੬ pg. 13)
1 MENU Button (੬ pg. 16)
2 White Balance Sensor
* Take care not to cover the sensor with your hand
while shooting.
3 Lens (੬ pg. 7)
4 Tally Lamp
The tally lamp lights while recording is in progress.
5 SNAPSHOT Button (੬ pg. 22)
6 Ext. Mic Input Jack (੬ pg. 7)
7 AV Output Jack (੬ pg. 7)
8 DC Input Jack (੬ pg. 7)
9 Multi Connector
* Located inside the cover. Connect to the Docking
Station’s multi connector. To avoid malfunction, do
not touch this connector or force the cover open.
0 LCD Display Window
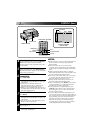
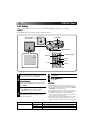
! Remaining Tape Time (during recording)
Time Code (during playback)
(Blinks)
Fullly
charged
2/3 Charge
Remaining
1/3 Charge
Remaining
No Charge
Remaining
STOP
PLAY
PAUSE
FF
CAN.
Battery Pack Remaining Power Indicator changes as follows
according to the battery pack’s remaining power level:
When the power is almost gone, the indicator blinks, then the
unit shuts off. Replace the battery pack with a fully charged one.
REW
RE SHOOT