


4
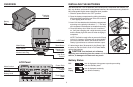
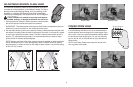
MOUNTING THE FLASH TO THE CAMERA
1. Slide the power switch to the “OFF” position.
2. Slip the flash unit onto the camera’s hot shoe. Turn the knurled lock ring to firmly affix
the flash unit.
CAUTION When using the flash on your camera, hold your camera and
not the flash. If you hold on to the flash only, your camera may slip off the flash
foot and be damaged, or the weight of the camera may damage the flash foot.
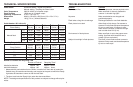
FLASH CHARGING STATUS
Ready Light Charging Level Flash Status
Lit Fully charged Ready for full emission
Blinking Charging Able to flash at current charge level
Off Empty Cannot flash
POWER SAVE AND AUTOMATIC SHUTDOWN
To save battery life, the flash automatically switches to the Standby state after 5 minutes
of inactivity or when your camera goes into LCD Time Out state. The LCD panel and
Ready Light turn off. To reactivate the flash, partly depress the camera’s shutter release,
or slide the power switch to the “OFF” position and then back to the “ON” position. The
flash Ready Light and LCD panel will go on again after a brief delay.
LCD BACK LIGHT
Use the LCD Back Light to illuminate the LCD panel for easy reading in dark conditions.
To turn on the LCD Back Light, press the Mode or Zoom button. After 5 seconds of
inactivity, the LCD Back Light automatically turns off.
MODE BUTTON
The Mode button toggles between:
• Camera Auto mode—the amount of flash is determined automatically in accordance
with the capture setting on the camera.
Auto OK icon—when the subject is within the auto effective range and there is enough
light, the Auto OK icon blinks for two seconds after the flash is fired. If the icon does
not appear, then there is not enough light for an exposure. Either move closer to the
subject or set the camera to Aperture Priority mode and select a larger aperture (smaller
f-number).
• Manual mode—the amount of flash is adjusted manually, with Power Ratio settings
of 1/1 (full emission), 1/2, 1/4, 1/8 or 1/16 power. Use the Mode button to toggle through
the settings.
NOTE: If the Mode Select button is pressed for more than one second, the mode will
change to Camera Auto mode.
ZOOM BUTTON
The Zoom button toggles between:
• Auto Zoom mode—flash focal length is determined automatically in accordance with
the capture setting on the camera. The focal length range is 24–80 mm. If the value
on the camera is less than or equal to 24 mm, “F mm” is displayed. If no information
is received from the camera, “-- mm” is displayed.
• Manual Zoom mode—flash focal length is set manually, with settings of 24 mm, 28
mm, 35 mm, 50 mm, or 80 mm.
If the Zoom button is pressed for more than one second, the mode will change to Auto
Zoom.
TEST BUTTON
If the Test button is pressed after the Ready Light goes on, a test flash fires.
FLASH RANGE SCALE
In response to a signal from the camera, the flash calculates the effective flash range
and displays it on the LCD panel. This range shows the minimum and maximum distances
a proper exposure can be made using the flash. To increase or decrease the effective
distances, set the camera to Aperture Priority mode and change the aperture setting. The
flash range scale changes as the aperture (f/stop value) is adjusted.
The available range will be displayed when you partly depress the camera’s shutter
release or when the Ready Light is on. The flash range is 1.5 –100 ft (0.5–30 m) and is
indicated by a bar graph. An asterisk indicates distances greater than 100 ft (30 m).