


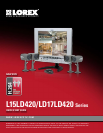
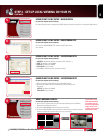

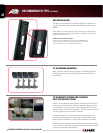

L15LD420/L17LD420 Series Quick Set-Up Guide R1
5
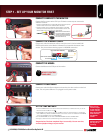
STEP 2 - SET UP LOCAL VIEWING ON YOUR PC
CONTINUED
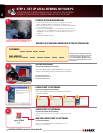
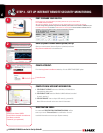
Congratulations! You
have completed Step 2
successfully. You can
now view and playback
images on your local
computer over the Local
Area Network (LAN).
Click the IRS Setup tab to configure the DDNS Settings (must be setup prior to using the H.264 Viewer).
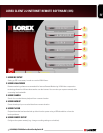
LOREX CLIENT 2.2 IRS SETUP - MAIN SCREEN
(on your local computer for local viewing)
5
ADMIN
6
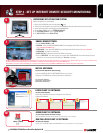
Click on the “REGISTERING SITE” button to add a new site to
your system.
LOREX CLIENT 2.2 IRS SETUP - REGISTERING SITE
(on your local computer for local viewing)
8
1. Once you see the registered site, press the SAVE button.
2. Click the OK button. You will be asked to key in the User ID and
Password.
USER ID: By default is ADMIN
PASSWORD: Leave it blank
LOREX CLIENT 2.2 IRS SETUP - REGISTERING SITE
(on your local computer for local viewing)
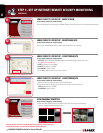
1
2
9
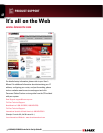
1. Once a site is registered for use, the interactive buttons part of the Main
Software Screen become active.
2. Click the H.264 VIEWER button to view your local site.
3. From the H.264 VIEWER screen (as shown in the picture), press the Connect
button to connect to Local Live site to view your cameras.
VIEW CAMERAS LOCALLY:
(on your local computer for local viewing)
1. ADDRESS: Add the IP address recorded earlier at Step 2 - 1
2. PORT: By default is set to 50000
3. USER ID: By default is ADMIN
4. PASSWORD: Leave it blank
5. Press OK to add the new site you have created
LOREX CLIENT 2.2 IRS SETUP - REGISTERING SITE
(on your local computer for local viewing)
1
2
3
4
5
7