


Adding Cameras
14
Adding Cameras
The System comes with a camera that has already been paired. The Pairing Function assigns each
camera to a different channel on the Wireless Receiver (up to 4 Cameras), and is necessary for
configuring additional cameras. By default, the camera included with the system appears on channels 1
on the wireless receiver.
Note: It is highly recommended to pair the cameras to the receiver before permanently mounting
the cameras.
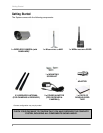
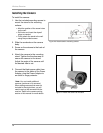
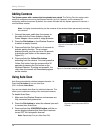
1. Connect the power cable from the camera to
the cable from the Power Adapter; plug the
Power Adapter into an outlet or surge protector.
2. Press the Pair button on the Wireless Receiver
to select an empty channel.
3. Press and hold the Pair button for 5 seconds to
activate pairing function. The on-screen
displays informs you that you have 30 seconds
to press the pair button on the camera (see
Figure 5.1).
4. Press and hold the Yellow Pair button
extending from the camera. You must press the
Yellow Pair button from the camera within 30
seconds of pressing the Pair button on the
Wireless Receiver. If pairing is successful, live
video from the camera will immediately appear
on the monitor.
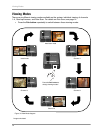
Using Auto-Scan
Auto-Scan automatically switches between channels 1~4.
Press the Pair button to turn on Auto-Scan
(CH1~4>Quad,>Auto-Scan).
You can also disable Auto-Scan for individual channels. This
allows you to customize viewing of the connected cameras.
To disable Auto-Scan:
1. Make sure the Wireless Receiver and cameras are
fully connected and powered on.
2. Press the Pair button to select the channel you wish
to remove from Auto-Scan.
3. Press and hold the VGA/QVGA button until the on-
screen display indicates that Auto-Scan has been
turned OFF for that specific channel.
Note: Repeat step 3 to turn Auto-Scan ON.
Figure 5.0 Pair button on the Wireless
Receiver
Figure 5.1 Pair button extending from camera
Figure 6.0 Auto-Scan turned OFF for
Channel 1.