


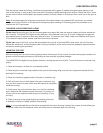

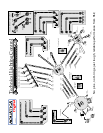

PREPARATION OF THE PORTS
1. Select the correct port:
Depending on whether you’ve decided to shoot macro or wide angle photography, you will be installing either a at Macro Port (product
# 18426 or 18428), or a Dome Port (Product # 18405, 18407,18409 or 18410). See lens chart for the suggest port and accessories.
Macro Port Extension Rings: the Macro Ports will accept the AF & AF-S Micro-Nikkor 60mm lens without extension. If you intend to use
a longer lens you will require an additional extension ring. These extension rings t between the Macro Port and the housing to provide
the extra space necessary for the longer lens.
Dome Port Extension Rings: When using a wide angle or zoom lens, the Dome Port may require the uses of an extension ring to
closely match the optical center of both the dome and the lens.
In order to reduce glare, maximize contrast and offer physical protection to the dome, the use of a dome shade is highly recommended.
See lens chart for the suggested dome shade.
A comprehensive list of the lenses supported and their required extensions and/or accessories is supplied at the end of this manual. For
the latest uptdated version of this lens chart, you can refer to the Lens Chart on www.aquatica.ca
2. Clean the port:
Dirt, grease or ngerprints on the port especially on the inside, can adversely affect the quality of the image. Acrylic ports should be
cleaned with plastic cleaner and the glass ports should be cleaned with lens cleaner. For more details be sure to read the section titled
“Care and Maintenance: of the Ports.”
3. Lubricate the port O-ring seal:
Before using the port, remove the O-ring on the rear of the port and lightly coat it with silicone grease. For more details be sure to read
the section titled “Care and Maintenance: of the O-rings.”
PREPARATION OF THE LENS
Depending on the lens used, there are a number of gear options possible. Using the right gear (s) and correctly mounting
them on the lens is very important for a smooth housing operation. Follow the installation directions included with each gears carefully.
Since the aperture control is achieved through the Sub-Command Dial, the use of AF types of lenses is mandatory.
A comprehensive list of the lenses supported and their required gears is supplied at the end of this manual. For the latest uptdated ver-
sion of this lens chart, you can refer to the Lens Chart on www.aquatica.ca
Notes: If the camera is set in manual focus a focus gear must be mounted on the lens. If you are using a zoom lens with a
zoom ring the camera must be on auto focus, also note that if using a dome port you may be required to install a closeup
diopter on the lens to correct the minimum focusing distance of the lens so that it will be able to focus on the virtual
image created by the dome. See lens chart for the suggested diopter, if required for your lens/port combination.
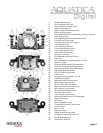
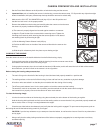
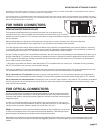
Gear installation:
Mount the focus gear over the focus ring of the lens.
(a) For Slip-on gears (gears without mounting screws): Slide the gear over the lens and align the gear with the front of the lens focusing ring.
(b) For gears with mounting screws: Lightly tighten the three set screws evenly. Tighten each screw approximately ½ a turn working
around the gear until all the screws are tightened and the gear is concentric with the lens body.
CAUTION: Do not over-tighten these screws, as this might bind the lens, thus restricting the rotation of the focus ring and/or damaging
the lens. Conversely under-tightening these screws might cause the gear to slip or loose alignment.
Rotate the focus ring several times to make sure it moves smoothly and the gear does not slip before closing the housing
WARNING: If the lens is a not of the AF-S type, never attempt to operate it with the camera in autofocus mode and with a mounted
focus gear engaged. This might cause serious damage to your camera or to the lens. With standard AF lenses switch from manual to
auto focus by lifting the focus knob and the underlaying disc (key # 10) rotate and position it so as to disengage the focus gear
mecha-
nism
, then switch the the MSC lever (key # 14) to the desired S or C position. Also avoid travelling with the zoom/focus gear attached
as any impact will be directed at the sensitive zoom or focus mechanism
Zoom lenses: When using a zoom lens, the gear should be mounted on the zoom lens control. The housing focus control thens
becomes
the zoom control. Focusing of lens is achieved by using the camera’s autofocus system.
page 6