


LENS INSTALLATION
With the camera inside the housing, install the lens prepared with its gears (if needed) through the port opening in the
front of the housing. if using a gear make sure that it is properly installed and aligned on the lens. Rotate the focus / zoom
control knob to ensure that the gears are properly meshed, that their rotation is smooth and that it does not do not grind or
bind.
Note: To avoid damaging the auto-focus mechanism of the camera when using standard AF type lenses, you should
always set the Focus Control to “M” Manual for testing the proper meshing of a focusing gears. this procedure is not
required with AF-S type lenses.
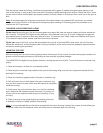
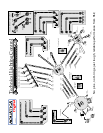
CHANGING A LENS (REMOVING A LENS)
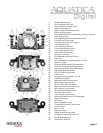
By the front: Remove the port, the lens mounted gears may restrict the view and ease of access to the lens release but-
ton of camera. The AQUATICA Digital Housing features a Lens Release Lever (key # 12) that is designed to trigger the
lens release button of camera to allow easy removal of lens. To remove a lens, simply rotate Lens Release Lever (key #
12) to press the camera lens release, hold and turn the lens clockwise.
By the rear: remove the back, pull out the lens release lever (key # 12) and the M/S/C lever (key # 14) out of the way,
release the saddle lock, remove hotshoe cable if using one and pull out the camera and lens assembly, replace lens and
reinstall by reversing this procedure.
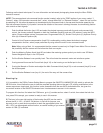
MOUNTING THE PORT
Before mounting the Port on the Housing always ensure that the port O-ring is clean, lubricated and properly seated in its
groove and that he sealing surface on the Housing is clean and free of physical damage.
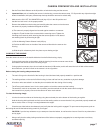
The AQUATICA Pro Digital Housing System features a locking bayonet mount (#21). To mount the port or extension ring
simply:
1. Place the housing on its back on a soft steady surface.
2. Place the port or extension ring inside the main port of the housing. Align one of the four alignment notches with the
opening of the housing.
3. Place your hands on opposite sides of the port or extension ring.
4. Push with even force on both sides of the port or extension ring
until you feel it snap into place. Make sure the bayonet is completely
inside the housing.
5. Finally press the port lock button down, turn the Port clockwise
until it stops and then release the port lock button. Do not force it.
If there is too much resistance take the port off, check the O-ring
and retry.
6. Check to ensure for the proper seating and sealing of the port
or extension and that it is safely locked on the housing.
Note : It is recommended that you familiarize yourself with this mount by trying it without the camera, this will allows you
to see the inside view of the bayonet mount and of the ports or extension rings in the housing.
page 8