


3Introduction: Getting to Know the Camera
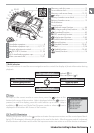
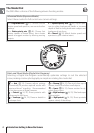
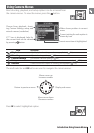
* Multi selector
The multi selector is used for menu navigation and to control the display of photo information during
playback.
View more photo info Playback ( 61)
Move cursor up Menu navigation (
9)
View previous photo
View next photo
Return to previous menu Display sub-menu
Cancel Make selection
View more photo info
Move cursor down
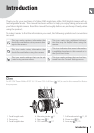
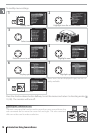
Help
For help on the current mode or menu item, press the
button at the
bottom left corner of the monitor. Help is displayed while the
button is
pressed; to scroll the display, press the multi selector up or down. Help is
available in
(auto) and Digital Vari-Program modes or when a icon is
displayed in the bottom left corner of the monitor.
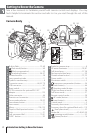
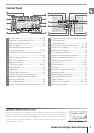
1 Viewfi nder eyepiece ....................................................8
2 Viewfi nder eyepiece cup ..........................6, 17, 21
3 Diopter adjustment control ................................. 17
4 (AE-L/AF-L) button ..................................... 31, 94
5 DK-5 viewfi nder eyepiece cap .............................. 8
6 Main command dial ......................................... 10, 91
7 Memory card slot cover ......................................... 15
8 Focus selector lock .................................................... 30
9 Memory card access lamp ............................ 15, 23
10
button ..........................................................................9
11 Battery-chamber cover latch ............................. 13
12 Battery-chamber cover .......................................... 13
13 Multi selector
*
14 Tripod socket
15 (playback zoom) button ................................. 64
QUAL (image quality/size) button .............. 34, 35
16
(thumbnail) button ...........................................63
ISO (ISO sensitivity) button .................................... 43
17
(help/protect) button ................................. 9, 65
WB (white balance) button ................................... 58
18
(menu) button .........................................................9
19
(playback) button ....................................... 26, 61
20 Monitor ........................................................................ 9, 26
21 (delete) button ............................................ 26, 65
(format) button .................................................16
5
3
4
6
7
8
9
10
11
12
13
14
15
16
18
19
21
17
20
21
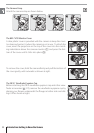
The LCD Illuminator
Holding the power switch in the position activates the exposure meters and the control panel back-
light (LCD illuminator), allowing the display to be read in the dark. After the power switch is released,
the illuminator will remain active while the exposure meters are active or until the shutter is released.