


BASIC
OPERATIONS-confinued
___
_
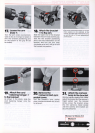
11
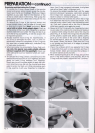
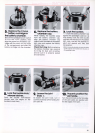
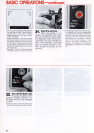
Insert
the
joint
plate
•
into
the
joint
collar @ .
While holding the base of the joint
knob against the joint, slide the joint
plate into the joint collar until
it
is
fully seated.
o
When
inserting the joint plate into the joint
collar, be sure the flat edges of t
he
joint plate
remain parallel to the flat edges of the joint.
14
Insert
the arm @
into
• the
joint.
Insert the arm positioning screw @
into the sl
ot
in
the joint.
The
arm
can
be
inserted from either side of
the joint.
The
normal position is
shown
in
the photo.
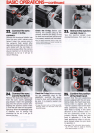
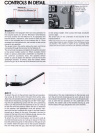
10
12
Lock
the
joint.
• Align the flash head position-
ing
index @ with the "normal" posi-
tion mark
on
the flash head posi-
tioning scale, then turn the joint
knob
clockwise until the joint
is
locked
in
position.
o
See
page
18
for information about removing
the joint.
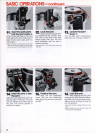
15
Position
the arm.
• Align the arm positioning
screw with the arm positioning
index
@
on
the joint by turning the
arm 90°.
13.
Loosen
the
joint
lever @.
Turn
the
jOint
lever counterclock-
wise
as
far
as
it
will go to loosen
it.
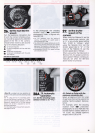
16
Lock
the arm.
• After aligning the arm posi-
tioning screw with the arm position-
ing
inde
x,
turn the joint lever clock-
wise
as
far
as
it will go to lock the
arm into position.
oNormally, the joint is locked
at
the top
of
the
arm.
o Before diving, be sure the
jOint
knob and
joint lever are locked tightly.