Copyright © 2004 Nokia. All rights reserved.
14
can use the Nokia Image Viewer by pressing the control buttons on the main
unit.
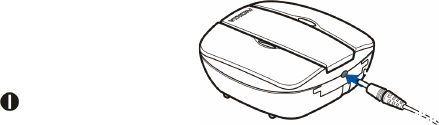
9. Connect the lead from the charger to the
socket at the back of the Nokia Image
Viewer and connect the charger to an AC
wall socket.
10.Press and hold on the main unit to
switch on the Nokia Image Viewer.
11.Connect the RCA connector from the Nokia Image Viewer to a TV.
If your TV does not have a RCA connector, you need a RCA/SCART adapter,
which you can obtain from an electrical supply store. If you are using a wide
screen TV set, the TV screen should be set to a 4/3 ratio.
12.Open the RCA input channel in the TV. The Nokia logo is shown on the TV
screen when the correct channel is opened.
13.Unwrap the Pop-Port
TM
connector from the bottom of the main unit and
connect it to the compatible phone’s Pop-Port
TM
. Make sure that the phone is
switched on.
A progress bar is displayed on the TV while the images are transferred from the
phone. While the progress bar is displayed, pressing any of the buttons on the
main unit or the remote control will have no effect. If no progress bar is shown,
switch the phone off and then on again.
Note that after the Nokia Image Viewer has transferred the images in the
phone to its own internal memory, you can disconnect the phone from the


