


20
EN
Using the self-timer
After the shutter button is pressed all the way
down, the picture is taken after a time delay.
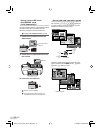
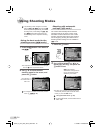
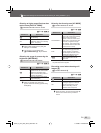
1
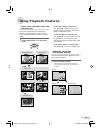
Press the Y button.
2
Use CE to select the setting
option, and press the x button to
set.
Item Description
OFF This cancels the self-timer.
ON
The self-timer lamp turns on for
approx. 10 seconds, and then
blinks for approx. 2 seconds, and
then the picture is taken.
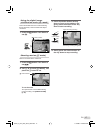
Self-timer shooting is automatically canceled
after one shot.
To cancel the self-timer after it starts
Press the Y button again.
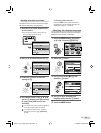
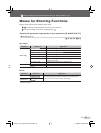
Changing the shooting
information display
The display of the screen information can be
changed to best match the situation, such as
clearing the information from the screen or to
make a precise composition by using the grid
display.
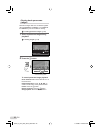
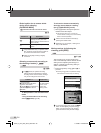
1
Press the g button.
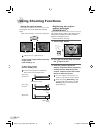
The displayed shooting information changes in
the order shown below each time the button is
pressed. “Shooting mode display” (p. 8)
●
Pressing the g button in G mode
displays the shooting mode or the settings
automatically selected by the camera.
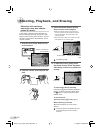
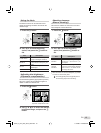
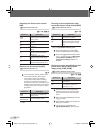
Using the FUNC menu
The FUNC menu provides the following menu
functions that can be quickly called and set.
[PROGRAM AUTO/
iAUTO
]
(p. 16)
[WB] (p. 24)
[ISO] (p. 24)
•
•
•
[DRIVE] (p. 24)
[METERING] (p. 25)
[D IMAGE QUALITY]
(p. 23)
•
•
•
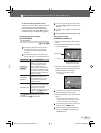
1
Press the x button.
2
Use CE to select the menu
function and FD to select the
setting option, and then press the
x button to set.
OFF
OFF
P
OK
OK
10
M
10
M
N
ORM
N
ORM
SET
SET
SELFTIMER
SELFTIMER
OFF
ON
Y
Y
10
M
10
M
+2.0
+2.0
P
4
4
IN
ISO
1600
ISO
1600
N
ORM
N
ORM
10
M
10
M
+2.0
+2.0
P
4
4
IN
ISO
1600
ISO
1600
N
ORM
N
ORM
Normal
No information Grid
10
M
10
M
ISO
AUTO
ISO
AUTO
WB
AUTO
WB
AUTO
ESP
ESP
N
ORM
N
ORM
P
n
ESP
ESP
ESP
d4377_e_oima_000_book_cs2e.indb 20d4377_e_oima_000_book_cs2e.indb 20 7/1/2008 12:08:58 PM7/1/2008 12:08:58 PM