VQT1R87
16
Preparation
Note
•
Do not turn this unit off, remove its battery or card or disconnect the AC adaptor
(DMW-AC5PP; optional) when the access indication is lit [when pictures are being read
or deleted or the built-in memory or the card is being formatted (P23)]. Furthermore, do
not subject the camera to vibration or impact. The card or the data on the card may be
damaged, and this unit may no longer operate normally.
• The data on the built-in memory or the card may be damaged or lost due to electromagnetic
waves, static electricity or breakdown of the camera or the card. We recommend storing
important data on a PC etc.
• Do not format the card on your PC or other equipment. Format it on the camera only to ensure
proper operation. (P23)
• Keep the Memory Card out of reach of children to prevent swallowing.
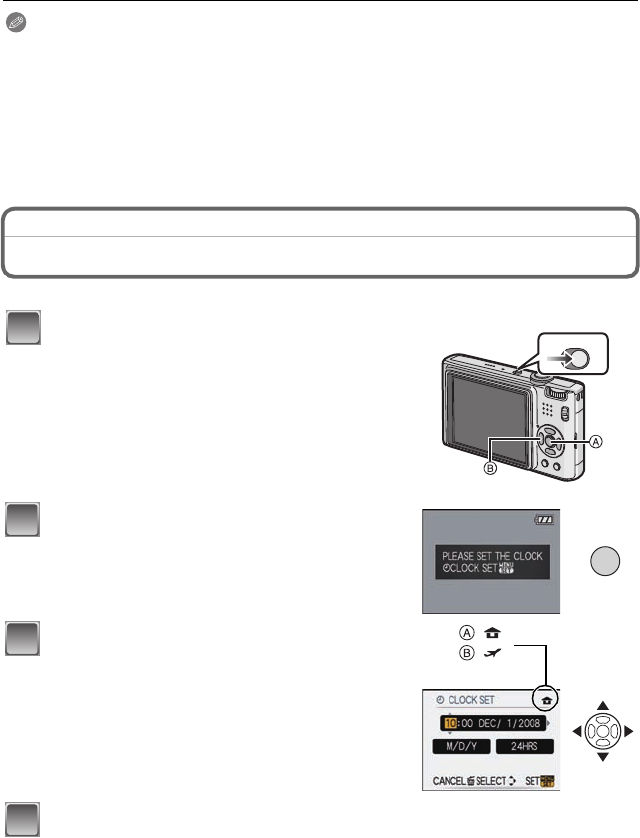
Setting Date/Time (Clock Set)
• The clock is not set when the camera is shipped.
Press [MENU/SET].
Press 2/1 to select the items (year, month,
day, hour, minute, display sequence or time
display format), and press 3/4 to set.
A: Time at the home area
B: Time at the travel destination (P56)
‚: Cancel without setting the clock.
•
Select either [24HRS] or [AM/PM] for the time display
format.
• AM/PM is displayed when [AM/PM] is selected.
Press [MENU/SET] to set.
• After completing the clock settings, turn the camera off. Then turn the camera back on,
switch to recording mode, and check that the display reflects the settings that were
performed.
• When [MENU/SET] has been pressed to complete the settings without the clock having
been set, set the clock correctly by following the
“Changing the clock setting” procedure
below.
Turn the camera on.
• The [PLEASE SET THE CLOCK] message appears.
(This message does not appear in [PLAYBACK]
mode.)
A [MENU/SET] button
B Cursor buttons
1
ONOFF
/SET
MENU
2
:
:
3
4
VQT1R87.book 16 ページ 2008年6月23日 月曜日 午前11時17分


