


82 VQT1P79 VQT1P79 83
Connecting
with other
devices
1
Using with your PC (Continued)
Connecting
with other
devices
2
Printing
New folders are created in the following cases:
• When pictures are taken to folders containing files numbered 999.
• When using cards already containing the same folder number (including pictures
taken with other cameras, etc.)
• When recording after performing ‘NO. RESET’ (P.25)
• File may not be able to be played back on camera after changing file name.
• If mode dial is set to , built-in memory data (including clipboard pictures) are
displayed even when card is inserted. Data in card is not displayed.
• When using Mac OS X ver.10.2 or earlier, set write-protect switch on card to ‘LOCK’
whenever handling pictures on SDHC memory cards.
If using Windows XP, Windows Vista, or Mac OS X
The camera can be connected to your computer even if ‘USB MODE’ (P.25) is set to
‘PictBridge (PTP)’.
• Only picture reading operations can be performed via the camera (picture deletion
also possible with Windows Vista).
• It may not be possible to read if there are 1000 or more pictures on the card.
To play motion pictures on your computer
Use the ‘QuickTime’ software on the supplied CD-ROM.
• Installed as standard on Macintosh
Save motion pictures to your computer before viewing.
To cancel print Press ‘MENU/SET’
Do not use any other USB connection cables except the supplied one.
Disconnect USB connection cable after printing.
Turn off power before inserting or removing memory cards.
When the battery begins to run out during communication, the status indicator flashes
and a warning beep sounds. Cancel printing and disconnect USB connection cable
(recharge the battery before reconnecting).
Setting the ‘USB MODE’ (P.25) to ‘PictBridge (PTP)’ remove the need to make the
setting each time the camera is connected to the printer.
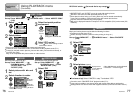
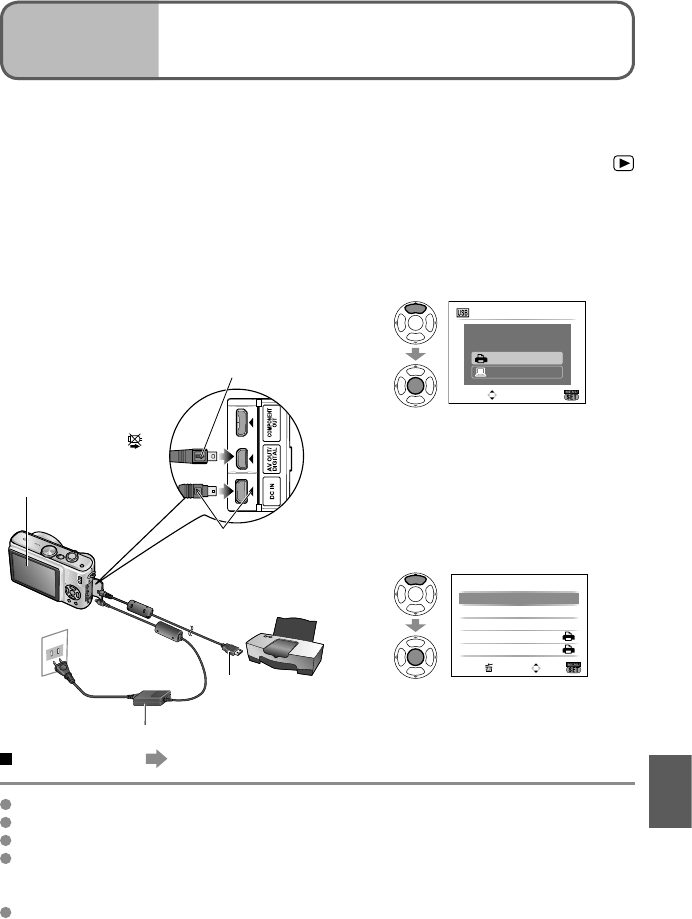
You can connect directly to a PictBridge-
compatible printer for printing.
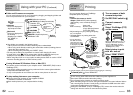
Set-up:
• Connect the camera to the AC
adaptor (DMW-AC5PP, sold separately).
(Alternatively, use a sufficiently-charged
battery.)
• Card :Insert card
Built-in memory: : Remove card
(Copy clipboard pictures
to the card (P.65))
• Adjust settings on your printer (print quality,
etc.) as required.
• Set mode dial to any setting other than
CLIPBOARD.
Built-in
memory/
Card
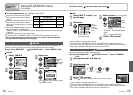
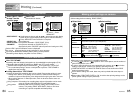
Windows
Drives are displayed in
‘My Computer’ folder.
Macintosh
Drives are displayed on
the desktop.
(Displayed as ‘LUMIX’,
‘NO_NAME’, or
‘Untitled’.)
JPG:
Still pictures
MOV:
Motion pictures
Folder and file names on computer
You can save images to use on your computer by dragging and dropping folders and
files into separate folders on your computer.
DCIM (Still/motion pictures)
100-PANA (Up to 999 pictures/folder)
P1000001.JPG
P1000999.JPG
101-PANA
:
999-PANA
MISC (DPOF files)
PRIVATE1 (clipboard pictures)
Built-in
memory
MEMO0001.JPG
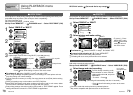
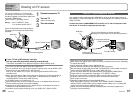
1
Turn on power of both
camera and printer
2
Set REC/PLAY switch to
3
Connect camera to
printer
4
Select ‘PictBridge (PTP)’
on the camera
PictBridge(PTP)
PC
PLEASE SELECT
THE USB MODE
USB MODE
SET
SELECT
When ‘CONNECTING TO PC…’ is
displayed, cancel the connection
and set ‘USB MODE’ to either
‘SELECT ON CONNECTION’ or
‘PictBridge(PTP)’ (P.25).
5
Select picture to print
with ◄► and set
6
Select ‘PRINT START’
SET
SELECT
CANCEL
PRINT START
PRINT WITH DATE
NUM. OF PRINTS
PAPER SIZE
PAGE LAYOUT
SINGLE SELECT
OFF
(Print settings → P.85)
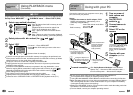
Check socket direction
and insert straight in.
(Damage to socket
shape can lead to faulty
operation.)
• Do not disconnect
the USB connection
cable when the cable
disconnection icon
is displayed (may not
be displayed with some
printers).
USB connection cable
(always use cable
supplied)
Hold here
If using AC adaptor, turn off camera power before plugging in or removing.