


28 LSQT1426 29LSQT1426
After setting the date and time, summer time can be set as in “Setting home
city and region” of the world time function (P.56).
If [
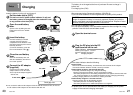
] is displayed for the date and time, the built-in lithium battery has run
down. Charge the battery and set the time as follows. The built-in lithium
battery is charged when the AC adaptor is connected to the unit or when a
battery is inserted into the unit. If charged for about 24 hours, the date and
time can be saved in memory for about 6 months. (The battery is charged
even if the power is turned OFF.)
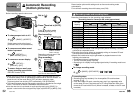
Adjusting the LCD monitor
LCD monitor color and brightness can be adjusted. (Settings do not affect
recorded images.) For settings from the menu see P.26.
The LCD monitor cannot be adjusted for self-portrait recording (P.47).
1
Select the desired menu.
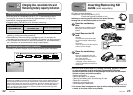
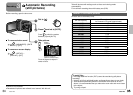
If the LCD monitor is hard to
see in bright or dark places
(POWER LCD)
Adjust the brightness of the LCD
monitor.
→[SETUP]→
[POWER LCD]
[AUTO] :
The LCD monitor brightness
is automatically adjusted
in line with the ambient
brightness.
: The LCD monitor brightens
more.
: The LCD monitor brightens.
: Normal brightness
: The LCD monitor darkens.
[
] is automatically selected
when the AC adaptor is used.
•
→[SETUP]→
[LCD SET]→[YES]
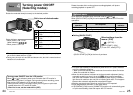
2
Select and adjust the
item.
Select an item. To adjust
The bar moves.
[BRIGHTNESS]:
Adjusts brightness.
[COLOR]:
Adjusts color density.
●
●
Setup
6
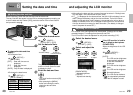
Setting the date and time and adjusting the LCD monitor
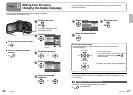
1
Set to [ ] or [ ].
2
Select the desired menu.
→[BASIC]→
[CLOCK SET]→[YES]
3
Set the date and time.
To select settings To change
numerical values
The year is displayed up to 2099
and the 12-hour system is used
to display the time.
4
Enter the date and time.
The clock function starts at [00]
seconds.
After pressing the [MENU]
button and closing the menu,
check the date and time
displays.
•
•
To change the date and time
display
To change an item
→[SETUP]→
[DATE/TIME]
[OFF] : Date and time are not
displayed.
[D/T] : Date and time are
displayed.
[DATE] : Only the date is displayed.
To change the date format
→[SETUP]→
[DATE FORMAT]
Format
indication
Appearance on
LCD monitor
[Y/M/D] 2009.DEC.15
[M/D/Y] DEC.15.2009
[D/M/Y] 15.DEC.2009
●
●
Setting the date and time
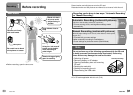
Before recording, check that the date and time have been set.
The very first time that power is turned ON, a message appears prompting you
to set the date and time. Select [YES], press the center of the cursor buttons
and proceed to step
3
.