-19-
This section describes the camera setup procedures
common to accesses from the PC and from the camera.
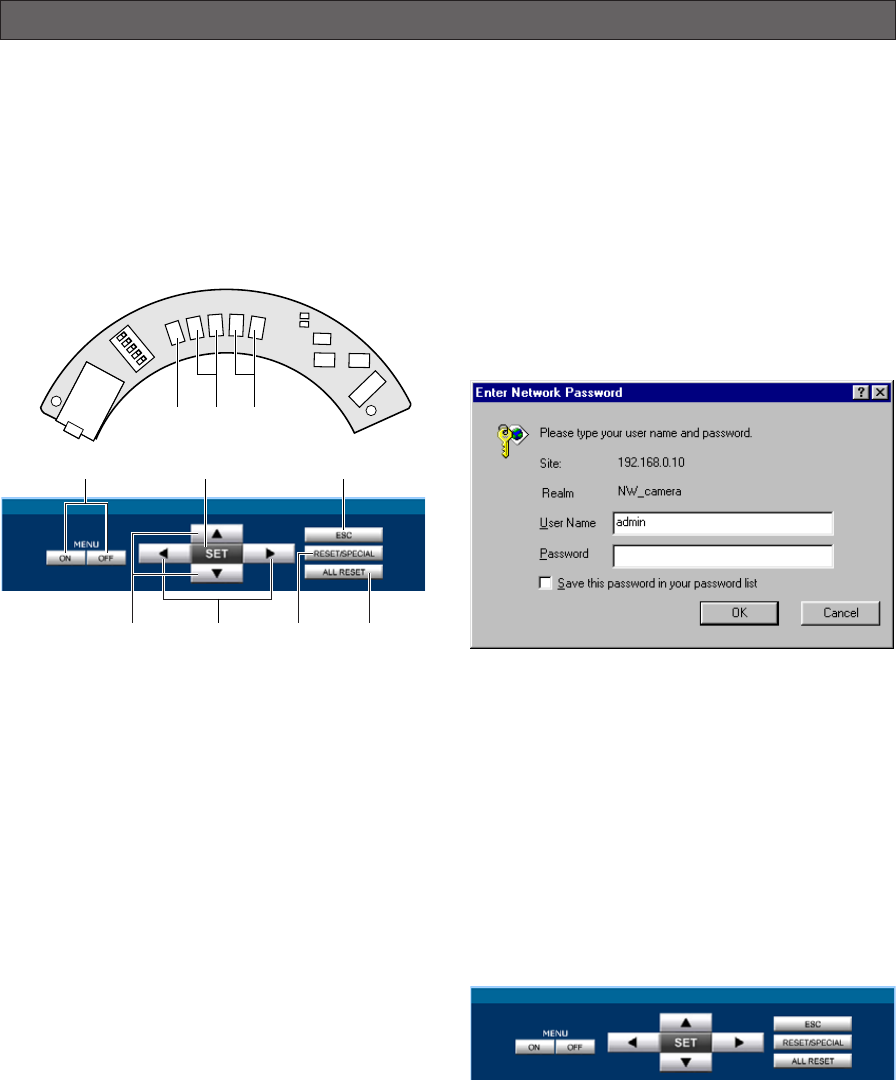
■ Buttons Used for Setup
Press the buttons inside the camera, or click the but-
tons on the computer display. Each button is assigned
functions in the setup as follows.
q Menu ON/OFF button: Opens or closes the setup
menu,
w SET button: Validates the selection, opens a
detailed menu.
SET button: (Inside the camera)
To open the setup menu, hold this down for 2 sec-
onds.
To close the setup menu, move the cursor to END
and press [SET].
To return to the previous menu, move the cursor to
RET and press [SET].
e ESC button: Returns to the previous menu (one
layer higher).
r Up/Down button: Moves the cursor up and down.
t Left/Right button: Moves the cursor right and left,
selects parameters, adjusts some levels.
y RESET/SPECIAL button:
Pressing [Right] and [Left], or clicking RESET/SPE-
CIAL: Resets the selected parameter to the factory
default when the cursor is on it, or opens the SPE-
CIAL menu when the cursor is on END at the bottom
of the menu.
u ALL RESET button:
Pressing [Right], [Left], and [SET] buttons simulta-
neously or clicking ALL RESET: Resets all settings to
the factory default.
PRIOR TO CAMERA SETUP
■ Camera Setup Menus
¡From the PC
For details, refer to the PDF manual contained in the
supplied CD-ROM.
1. Open the Main Menu of the camera, referring to
page 17.
Log in as a level-1 administrator in the dialog box if
requested.
2. Click the Setup Menu button on the left side of the
screen.
The login dialog box will appear.
Note: Confirm the entered IP address when neither
the dialog box nor the Main Menu appears. You
may need to re-enter the IP address.
3. Enter the registered user name and password.
Note: Enter "admin" when you operate the system
very first time, or you have not registered user
names yet. For this time, you need not to enter
the password.
Menu control buttons will appear under the camera
image.
A
B
L
EFT
R
IGHT
U
P
D
OWN
SET
LINK
LED
O
FF
LED
O
N
R
C
V
wrt
q w e
tr y u


