18 Pelco Manual C342M-PSA (11/98)
(7) Line up the hole in the gear train nut with the nearest hole in the gear
train bracket (E).
(8) Replace the screw.
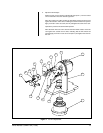
b. Refer to Figure 13. Adjust chain tension, if needed:
(1) Locate the pan or tilt motor on the assembly. Loosen the hex screws (G)
that hold the motor to its mounting bracket. Depending on which motor
assembly you are adjusting, there will be either three (pan) or four (tilt).
(Only two screws are shown in Figure 13.)
(2) Using a screwdriver, pry the motor down at H to tighten for the correct
chain tension. (You should not be able to freely move the motor with your
finger, nor should it be so tight that it will not move at all as this usually
leads to binding.)
(3) Tighten the hex screws.
c. Using a controller, you should now be able to move the PT780 without loose-
ness or binding. If you have any problems, contact Pelco’s Technical Support
Department.
5. Lubricate the chains. Use a Teflon chain lubricant, such as TriFlon™.
6. Replace the covers. (Refer to step 2 under Section 3.5, FINAL INSTALLA-
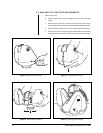
TION.) When you reinstall the covers, apply new silicone sealant as shown in
Figures 9 and 12.


