


2120
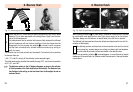
6. Bounce flash
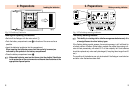
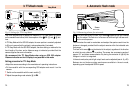
Fig. 13: Bouncing the flash (The photo was shot with the flash bounced off the right wall)
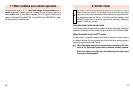
Photos shot with full frontal flash are easily recognized by their harsh, dense
shadows. This is often associated with a sharp drop of light from the fore-
ground to the background.
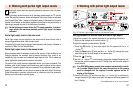
This phenomenon can be avoided with bounce flash because the diffused
light will produce a soft and uniform rendition of both the subject and the
background. For this purpose the reflector
³
is turned in such a manner
that the flash is bounced off a suitable reflective surface (e.g. ceiling or
walls of a room).
T
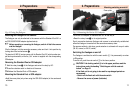
he reflector can be turned vertically and horizontally.The vertical lock-in positions
for bounce flash are:
• 60°, 75° and 90° (simply tilt the reflector to the required angle)
The flash head can be swivelled horizontally through 270°, and locks into position
at 60°, 90°,and 180°.
The distance values on the LC display disappear as soon as the reflector
is tilted upwards or the flash head turned horizontally. The distance from
the flashgun to the ceiling or wall and from there to the subject is now an
unknown factor.
Ǻ
☞
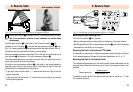
6. Bounce flash
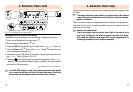
Fig. 14: Lock-in positions of reflector and head
When tur
ning the reflector
³
, or flash head,it is essential to ensure that it is moved
by a sufficiently wide angle so that direct light can no longer fall on the subject.
Therefore, always turn the reflector or head at least to the first lock-in position.
The diffused light bounced back from the reflective surfaces results in a soft illu-
mination of the subject.
The reflecting surface must be white or have a neutral colour and it must not
be structured (e.g. wooden beams in a ceiling), as these might cast shadows.
For colour effects just select reflective surfaces in the desired colour.
Use of the secondary reflector
is advantageous to avoid disturbing dense
shadows with bounce flash, for instance under the nose and in the eye sockets,
in portraiture.
Ǻ