


2322
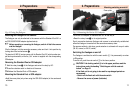
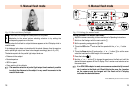
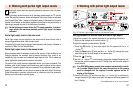
6. Bounce flash
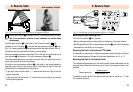
Fig. 15: Bounce flash with switched-on secondary reflector
The secondary reflector
produces frontal fill-in light when bouncing the flash.
Use of the secondary reflector is only advisable for bounce flash
photography.
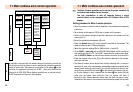
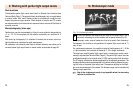
The secondary reflector
is switched on and off with the switch
ቱ
.
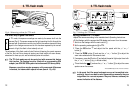
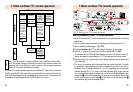
Symbols on the LC display indicate that the secondary reflector
is on
(Fig. 16).If these symbols flash, you are advised that the main reflector is not til-
ted and that use of the secondary reflector is not expedient.
When the secondary reflector is activated, 90% of the light will be emitted by the
main reflector
³
, and approx. 10% by the secondary reflector
.
The stated percentages may vary when using the flash with partial light output
levels and switched-on secondary reflector.
If the light from the secondary reflector
is too bright, it can be diminished by
attaching one of the two light reducing filters. They are at the back of the main
reflector and their characteristics are as follows:
•1 light grey filter with the symbol „-1“ reduces the amount of light to half the
original brightness.
•
1 dark grey filter with the symbol „-2“ reduces the amount of light to one quarter
of the original brightness.
with secondary reflector
Ǻ
☞
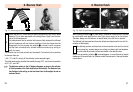
6. Bounce flash
Fig. 16: Switching on the secondary reflector - Display
Mounting the light reducing filter:
•Tilt the main reflector
³
90° upwards.
•Remove the required light reducing filter from the back of the main reflector.
•
Slip the light reducing filter on the secondary reflector
, over the AF measuring
beam aperture, and allow it to lock in place.
Bouncing the flash in the auto and TTL modes
It is advisable to check prior to the actual exposure whether the light is sufficient
for the selected aperture. Proceed in the manner described in ch.14, p. 47.
Bouncing the flash in the manual mode
The required camera aperture in the manual mode is best established with an
exposure meter. Observe the following rule of thumb if an exposure meter is not
available:
Camera aperture =
Guide number
Light distance x 2
to establish a guide value for the aperture that can then be varied by + 1 f-stop
for the actual exposure.