


11
2. Preparations
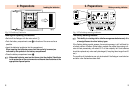
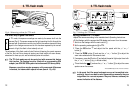
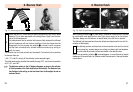
Fig. 4: Fixing the flashgun
Mounting the flashgun on the camera
The flashgun can only be attached to the camera with the Standard Foot 301 or
an SCA 300/SCA 3000 adapter (optional extra).
Before mounting or removing the flashgun, switch off both the camera
and the flashgun
Slip the flashgun into the camera’s accessory shoe and lock it into position by
turning down the knurled screw
ᕤ
.
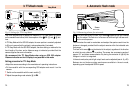
The standard 40 MZ-3(i) version comes with the Standard Foot 301 which provides sim-
ple
flash synchronisation, while the „Set“ version is supplied with the corresponding
SCA adapter.
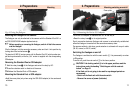
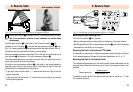
Removing the Standard Foot or SCA adapter:
1 Hold the rotary base
ᕣ
of the flashgun and swivel the body by 90°.
2 Press the retention catch in direction of the arrow.
3 Withdraw the Standard Foot or SCA adapter.
Mounting the Standard Foot or SCA adapter:
•Hold the cover plate (only when using the SCA 3000 adapter) in the centre and
withdraw.
Mounting
10
☞
2. Preparations
Fig. 5: Removing the Foot or SCA adapter
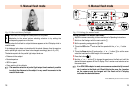
•Push the SCA adapter or Standard Foot 301 all the way in.
•Reset the rotary base
ᕣ
to its original position
Synch connection between flashgun and camera is automatically established
when the flashgun is inserted into the camera’s accessory shoe.
On cameras without a hot shoe, synchronisation is achieved with a synch cable
(36-50, normal, or 36-52,coiled).
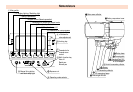
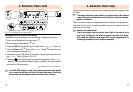
Switching the flashgun on and off
The flashgun is switched on with the main switch
ቢ
. It is permanently on when
in ON position.
To switch off, push the main switch
ቢ
to the lower position.
CAUTION! If the locking switch ቫ is in the upper position,read the
instructions under the heading "Switching on with the controls
locked" on Page 51.
If the flash unit is not going to be used for a prolonged period we
recommend:
- Switch off the flash unit with the main switch
- Remove the source of power (batteries).
Mounting, switching on and off
Cover plate
☞