2
3.0 TAKING A PICTURE
1. Verify the LCD (#2 from Location of Controls) displays the number of pictures remaining.
If the display is other than a number, press the mode button until a number is displayed. If
this is the first time the camera has been activated, the LCD should read “20”. This number
represents the number of images the camera is capable of recording before transfer of the
images is required.
2. Slide up the viewfinder switch(#7 from Location of Controls) and the viewfinder will come
up at the top. Keep the camera at a distance until you can see clear through the Viewfinder.
Hold the camera steady and press the Shutter button (#6 from Location of Controls) until
you hear 1 beep. A photo was taken successfully.
3. The number shown in the LCD will decrement each time a successful picture is taken.
4. If the counter has not been decremented it may be due to the Shutter button is not pressed
properly.
5. Ultimately, “00” will be shown on the LCD display indicating that the camera memory is full.
6. Refer to section 6.0 to install Availasoft software onto your computer and section 7.0 to
upload pictures to your PC from the camera.
7. After uploading and storing images to your PC, refer to section 5.0 Additional Features for
instruction on how to clear all images from camera memory.
4.0 The BATTERY and AUTO STAND-BY MODE
1. The camera will switch to stand-by mode after 30 seconds of inactivity. The LCD will go
blank. This helps to conserve battery power.
2. If the camera is in stand-by mode, pressing the Mode button once will bring the camera out
of stand-by mode. Any pictures taken will remain in the memory.
3. If the battery power is low, the LCD will display “Lo” and flash. Both shutter and mode
buttons will not function when pressed. The camera will then switch to Stand by mode. You
should replace the battery at this time.
Note: Always download all images to PC before replacing the battery. The photos will
be lost if battery is removed or run out of battery.
Note: Low battery power will affect image quality & performance of the camera.
.
5.0 ADDITIONAL FEATURES
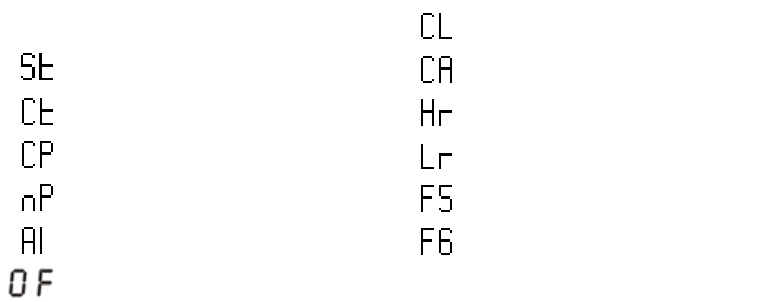
Press the Mode button repeatedly until the desired features are shown on the
LCD display. Then press the shutter button to activate the feature.
20 Normal mode
Self-Timer Mode
Continuous shooting Mode
Compress Mode
Non-compress Mode
Video function mode
Switch the camera to Stand by Mode
Delete last photo
Delete all photos
High resolution format
Low resolution format
50Hz
60Hz


