


ENGLISH FRANÇAIS
34
Advanced Recording Perfectionnez vos enregistrements
CUSTOM - Creating your own customized recording settings
✤ You can customize the settings and save them for future use.
■ The CUSTOM function only operates in CAMERA mode.
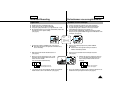
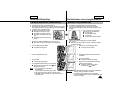
1. Set the power switch to CAMERA mode.
(see page 18)
2. Press the MENU ON/OFF button, to bring up
the MENU list.
3. Turn the UP/DOWN dial until
CUSTOM..........SET is highlighted.
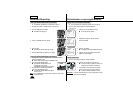
4. Press the ENTER button, the CUSTOM menu
will appear.
■ Set the status of each item to what you want.
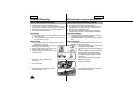
5. To exit the menu, press the MENU ON/OFF
button twice.
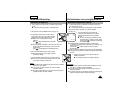
6. By pressing the CUSTOM button, the custom
settings will come up.
■ Date/Time and Title will only appear if these
have been set in advance.
■ The word “CUSTOM” will be displayed on
the LCD at the same time.
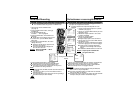
Example:
When the CUSTOM.........SET is
set as follows;
7. Press the START/STOP button to start recording.
■ Recording will begin using the new CUSTOM settings.
8. To switch Custom off, press the CUSTOM button once.
■ The camera will revert to the settings that were set prior to
the CUSTOM mode being switched on.
Notes:
■ In CUSTOM mode, the MENU, MF, DSE and P.AE functions are
not available.
■ If you want to use these, you must first switch the EASY or
CUSTOM mode off.
■ The CUSTOM settings will be stored in the camera (providing a
good lithium battery has been installed).
Mode CUSTOM - Personnalisation des réglages pour l'enregistrement
✤ Vous pouvez personnaliser et mémoriser les réglages du camés-
cope pour vos enregistrements ultérieurs.
■ La fonction CUSTOM est uniquement disponible en mode
CAMERA.
1. Placez le commutateur principal sur la position
CAMERA. (voir page 18)
2. Appuyez sur la touche MENU ON/OFF pour faire
apparaître le menu.
3. Sélectionnez l'option CUSTOM....SET à l'aide
du bouton UP/DOWN.
4. Appuyez sur la touche ENTER.
Le menu CUSTOM s'affiche.
■ Réglez chaque option à votre convenance.
5. Appuyez deux fois sur la touche MENU ON/OFF
pour quitter le menu.
6. Appuyez sur la touche CUSTOM pour remplacer
les anciens réglages par vos nouveaux réglages.
■ La date, l'heure et le titrage apparaissent
uniquement si leur affichage a été activé par
avance.
■ L'indication CUSTOM s'affiche sur l'écran LCD.
Exemple
: lorsque l'option CUSTOM...SET
est réglée comme suit ;
7. Appuyez sur la touche START/STOP pour démarrer l'enregistrement.
■ L'enregistrement s'effectue selon vos nouveaux réglages.
8. Appuyez sur la touche CUSTOM pour quitter le mode CUSTOM.
■ Le caméscope retrouve ses réglages antérieurs.
Remarques
:
■ En mode CUSTOM, certaines fonctions telles que MENU, MF,
DSE ou P.AE ne sont pas disponibles.
■ Vous devez tout d'abord quitter les modes EASY ou CUSTOM
pour pouvoir utiliser ces fonctions.
■ Le caméscope garde en mémoire les réglages du mode CUSTOM
s'il dispose d'une pile au lithium suffisamment chargée.
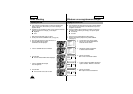
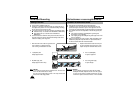
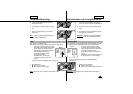
Pressing the CUSTOM button,
displays
●
CUSTOM
●
DIS....................ON
D.ZOOM ............ON
WHT.BAL ..........AUTO
DISPLAY............OFF
D/TIME ..............DATE
TITLE ................AUTO-10S
EXIT: MENU
LCD ADJUST
CUSTOM SET
CLOCK SET
TITLE SET
TITLE....................OFF
DIS........................OFF
EXIT: MENU
LCD ADJUST
CUSTOM SET
CLOCK SET
TITLE SET
TITLE....................OFF
DIS........................OFF
EXIT: MENU
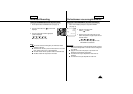
●
CUSTOM
●
DIS....................ON
D.ZOOM ............OFF
WHT.BAL ..........OUTDOOR
DISPLAY............ON
D/TIME ..............DATE
TITLE ................OFF
EXIT: MENU
STBY
0:00:00
CUSTOM
OUTDOOR