


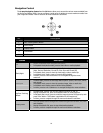
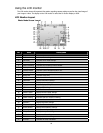
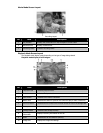

Navigation Control
The 4-way Navigation Control and the OK button allow you to access the various menus available from
the On Screen Display (OSD). You can configure a wide range of settings to ensure maximum results from
your images and videos. Further functions of these buttons are as follows:
No. Description
1 Face Tracking/Rotate Button
2 Macro Button
3 Display Button
4 Flash Button
5 OK Button
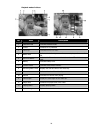
Button Description
OK
1. Confirm a selection when using the OSD menus.
2. In Playback Movie/Audio mode, press to Start video or audio playback.
Flash/Right
1. In Photo Mode, press to scroll through the flash mode options.
(Auto, Red-eye Reduction, Forced On, Slow Sync and Forced Off)
2. In Playback mode, press to view the next image, video or audio clip.
3. In playback Movie mode, press to Forward video playback.
4. In Menu, press to enter the submenu or to navigate through the menu
selections.
Macro/Left
1. In Photo Mode, press to scroll through Macro options. (Macro, Pan Focus, Infinity
and normal)
2. In Playback mode, press to view the previous image, video or audio clip.
3. In Playback movie mode, press to Rewind video playback.
4. In Menu, press to exit a submenu or to navigate through the menu selections.
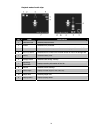
Up/Face Tracking/
Rotate
1. In Photo Mode, press to turn the face tracking function on and off.
2. Playing Video/Audio file, press to Pause/Start video or audio playback.
3. In Playback photo mode, press to rotate the image clockwise 90 degrees by each
press of the button. This feature is applicable for still images only.
4. In Menu, press to navigate through the menu and submenu selections.
Display/Down
1. The LCD monitor can be changed into 4 different types such as Basic, Full, None
and Guideline.
2. Playing Video/Audio file, press to stop video/audio playback.
3. In Menu, press to navigate through the menu and submenu selections.
14